Setup Manual
Please follow the instructions below to set up your TestArchitect software and get the most out of your TestArchitect license, then starting with some automation test.
Table of Contents
PREPARATION
1. Hardware Requirements
These hardware requirements apply to all versions of TestArchitect.| TestArchitect Client | TestArchitect Repository Server | |
|---|---|---|
| Operating System | MS Windows: Windows 10 Windows 11 Windows Server 2016 Windows Server 2019 Linux: CentOS 7.9 | MS Windows: Windows 10 Windows 11 Windows Server 2016 Windows Server 2019 Linux: CentOS 7.9 |
| RAM | 4 GB | 8 GB |
| HDD/SSD | At least 10 GB available space | Available space of at least 10 GB plus the total aggregate size of all databases |
| CPU | 2 GHz dual-core or faster | 3.1 GHz quad-core |
- If you enable the TestArchitect Genie feature, please refer to the Recommended System Requirements for more details.
2. TestArchitect Supported Platforms
| Operating System | Supported Platforms |
|---|---|
| Windows 11 & Windows 10 | Mobile: - iOS 16.x - Android 13 - Appium 1.22.3 & 2.x Desktop Browsers: - Chrome 143 - Edge Chromium 143 - Firefox 146 SAP: - SAP GUI Client: 7.6 Patch 4 - SAP Server: ECC 6.0 Desktop app: - .NET Framework: v4.8, v4.5.1, v4.5 (WPF, WPF_Telerik, WPF_XCeed, WINFORM, WINFORM_Telerik) - .NET v6 (WPF, WINFORM) - MFC - Oracle JAVA 6, OpenJDK 8, 11, 17, 21 - QT (on-demand) Database:
|
| Windows Server 2016 | Desktop Browsers: - Chrome 143 - Edge Chromium 143 - Firefox 146 Desktop app: - .NET Framework: v4.8, v4.5.1, v4.5 (WPF, WPF_Telerik, WPF_XCeed, WINFORM, WINFORM_Telerik) - .NET v6 (WPF, WINFORM) - MFC - Oracle JAVA 6, OpenJDK 8, 17, 21 - QT (on-demand) Database:
|
| Windows Server 2019 | Desktop Browsers: - Chrome 143 - Edge Chromium 143 - Firefox 146 Desktop app: - .NET Framework: v4.8, v4.5.1, v4.5 (WPF, WPF_Telerik, WPF_XCeed, WINFORM, WINFORM_Telerik) - .NET v6 (WPF, WINFORM) - MFC - Oracle JAVA 6, OpenJDK 8, 17, 21 |
| Linux | - Firefox 78 Extended Support Release (ESR) - Oracle JAVA 6, OpenJDK 8, 17, 21 |
3. Subscription Account
- You need to have a subscription account ready
- If not, please using your business email to register an account to hold your purchased subscription
- Please take note or remember your subscription account to login into TestArchitect License server later
4. Network Environment
- Ensure you are online when using TestArchitect
- If your environment could not access internet, or be in a closed or secured network, please contact [email protected] with your justification to purchase an offline license key.
INSTALLATION GUIDE
Following will explain the installation steps. After installation, you need to configuration setting and perform some initial setup to get started with Website automation testing as an example.
| Step | Content | Details |
|---|---|---|
| 1 | Download installers | Check 2 downloaded installers |
| 2 | Install client and repository server | Extract the downloaded ZIP file and install client and repository server |
| 3 | Install License server | Install License server from unzipped License server installer |
| 4 | Setup licenses | Configure license settings and make connection from TestArchitect client to License server |
| 5 | Connect Repository server | Make a connection from TestArchitect client to Repository server and retrieve repository |
| 6 | Initial setup | Configure settings to run a test script |
| 7 | Operation verification | Run a script to confirm the setup was successful |
| 8 | Frequently asked questions and troubleshooting | Help finding out what you don’t know when you are in trouble of TestArchitect setup |
1. Prepare Installers
1.1. Download Installers
- Use your subscription account mentioned in the session above to log in to the TestArchitect website. Then click the Free Download button to download the necessary installers

- Select the build that fit your language and OS in Download Now box.
- Accept TestArchitect End User License Agreement and Privacy Policy.
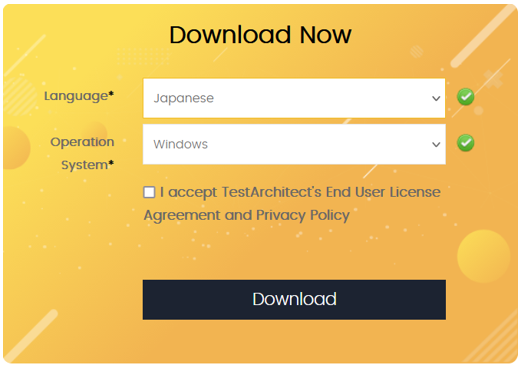
- Note: if you have problems with the download, please contact LogiGear at [email protected].
After downloading TestArchitect, the .zip file contains two installer files.
TestArchitect IDE and License Server installers.
- Note: if you have problems with the download, please contact LogiGear at [email protected].
- You cannot change the language after installation, so please select suitable language when downloading TestArchitect
- In installer file, the number after the name is the build version, it changes after each release
1.2. Installation Environment
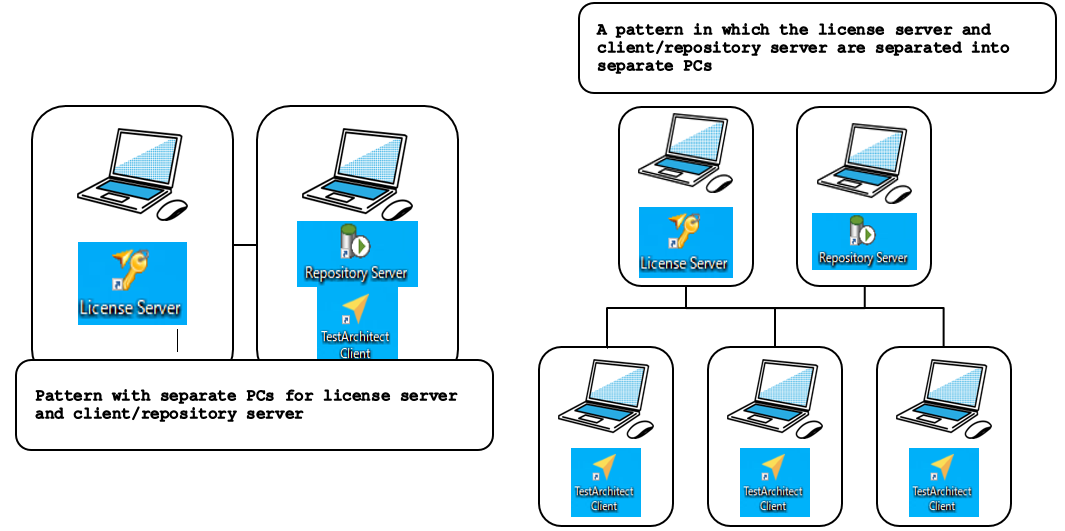
As best practice, when using multiple TestArchitect clients, the license server and clients should be installed separately to keep license secured. But, when using one client, it is also possible to install the license server and client on one PC.
1.2.1. Single PC pattern
All TestArchitect components are installed on one PC
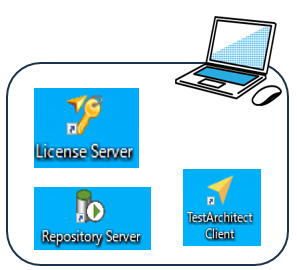
- If you want to try TestArchitect quickly and easily, please proceed with building environment here
1.2.2. Multiple PCs pattern
Use multiple PCs to separate license server and clients PCs
- A normal development environment uses TestArchitect clients on multiple PCs, please build with this environment
2. Installing the Client and Repository Server
Before upgrading to a newer version of TestArchitect, it is strongly recommended to:
- Backup any existing repositories you may have.
- Uninstall the old version of TestArchitect.
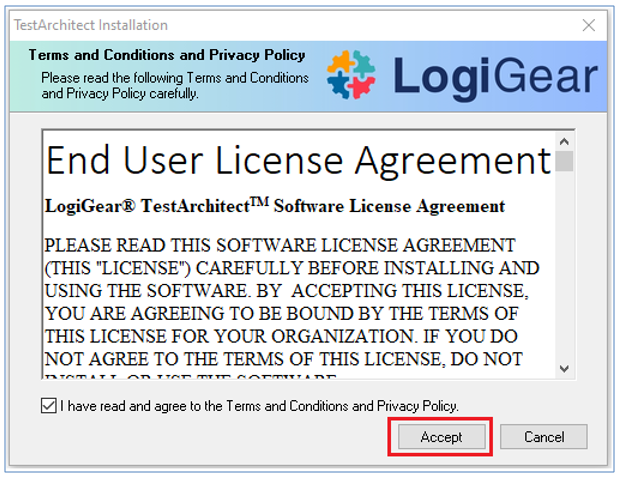
2.1. Once you have the installation file on your system, double-click to open it with administrator privileges to start the installation process. The Welcome dialog box appears, displaying the software license agreement specifying the terms of TestArchitect usage.
2.2. To proceed, please read through the license agreement and then select the check box labelled I have read and I agree with the terms and conditions of this license agreement, then click Accept.
2.3. Installation options
You can choose between two options for installing TestArchitect:
- Quick Install: Install TestArchitect with the default settings.
- Custom Install: View the modifiable installation settings and, if so desired, change them from their defaults.
- Please choose Custom Install if you follow multiple PCs pattern
Select the type of installation, then proceed with either the Quick Installation Procedure ① or the Custom Installation Procedure ②. After completing that, proceed to step 2.4., which is the common installation step “Server Configuration.”
- When installing, a new SampleRepository will be installed. It will overwrite any existing ones. The SampleRepository contains sample test modules for TestArchitect.
Optional: If you have installed TestArchitect previously, a confirmation message appears asking whether you wish to replace the sample repository named SampleRepository.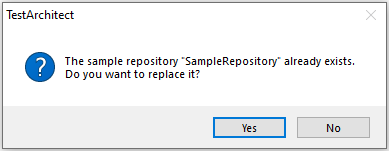
- Click Yes to replace your existing SampleRepository with a fresh copy, thus losing any changes or additions you may have made.
- Click No if you wish to continue working with your existing sample repository.
① Quick Installation
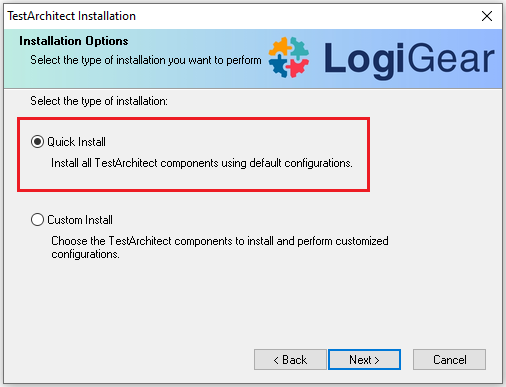
On the Installation Options dialog box, select the Quick Install option and click Next.
Notes:- Selecting Quick Installation will install both TestArchitect client and the repository.
The Installation Summary dialog box appears.
The default installation settings are displayed in the Current Settings text box as follows: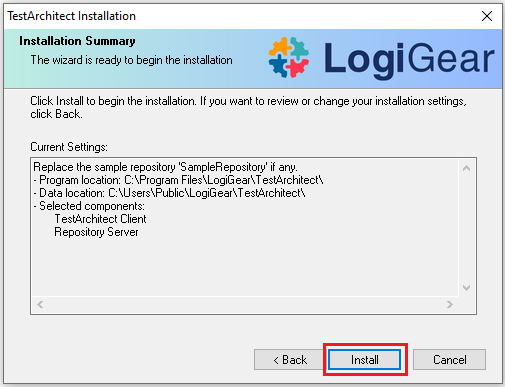
Click Install to start the installation process.
A message box appears indicating the task being performed, and a progress bar shows the degree to which the installation is complete.
After completing the steps above, please proceed to step 2.4. Server Configuration below.
② Custom Installation
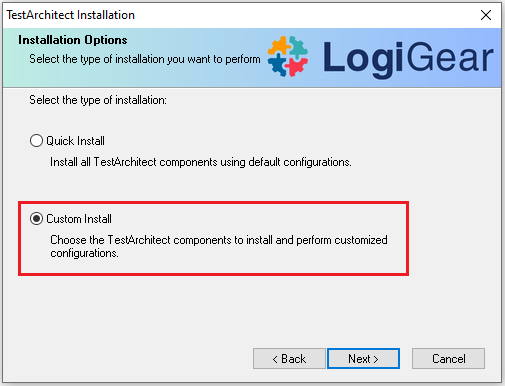
On the Installation Options dialog box, select the Custom Installation option and click Next.
Notes:- If you want to install the repository server and client on separate PCs, select custom installation.
The Select Components dialog box appears, allowing you to choose what components of TestArchitect are to be installed. If the check box next to a component is selected, that component is installed during this process. Conversely, if the check box is cleared, that component is not installed.
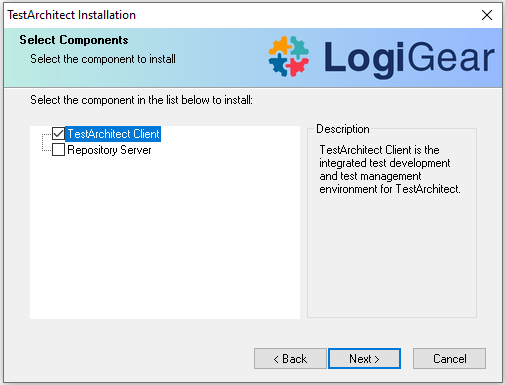
Example image above, select install client only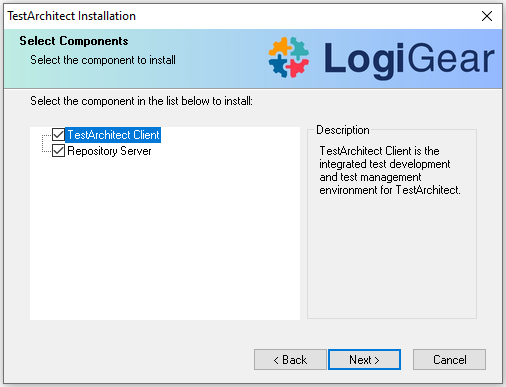
Example image above, selecting to install both client and repository server
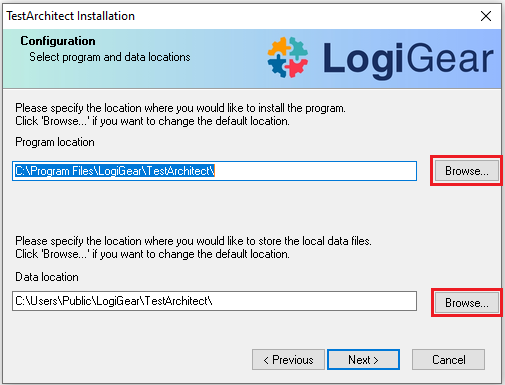
Click Next to continue with the installation.In the Configuration dialog box, use the Browse buttons to choose the program and data locations for TestArchitect. Alternatively, just accept the default locations.
Click Next.The Create desktop shortcuts dialog box allows you to choose which components of TestArchitect are to have shortcuts available on your computer desktop.
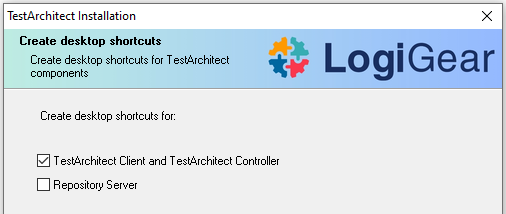
Example image above, select install client only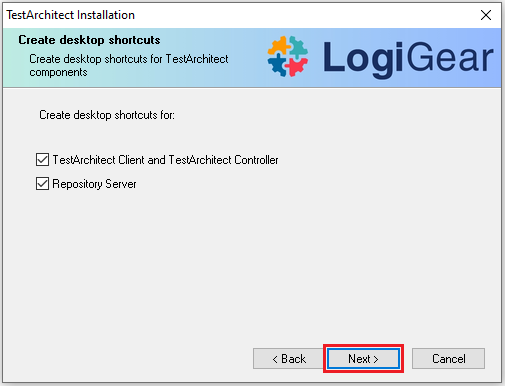
Example image above, selecting to install both client and repository serverClick Next to continue with the installation. The Installation Summary dialog box appears.
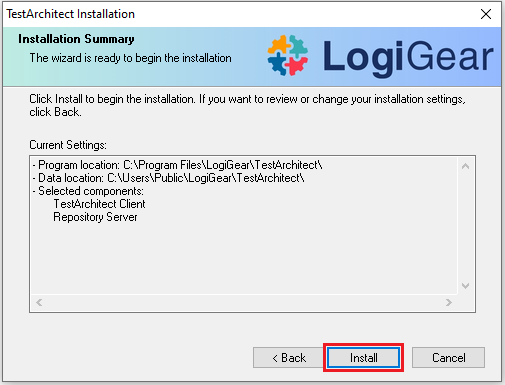
Click Install to begin the installation process.
A message box appears to display the tasks being performed, along with a progress bar presenting the installation’s degree of completion.
After completing steps above, please proceed to step 2.4. “Server Configuration” below.
2.4. Server Configuration
In the Server Configuration dialog box, you may choose between two types of accounts under which the repository server is to be started.
The TestArchitect Repository service serves for connecting from clients or controllers to Repository server. It runs under background process.
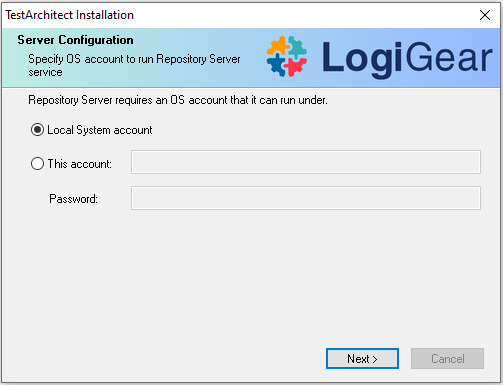
Local System Account: (Default) A predefined local account used by the service control manager. This account has privileges on the local computer, acts as the computer on the network, but might have limited network access rights (Learn more)
This account: Specify a local user account, or a domain user account. Ensure that the account belongs to the administrator group of the given machine to allow the Repository Server service to start successfully.
- A local user account has the following name format: (“.\username”). For example:

- A domain user account has two possible name formats: the distinguished name of the user object in the directory, and the
<domain>\<username>. For example: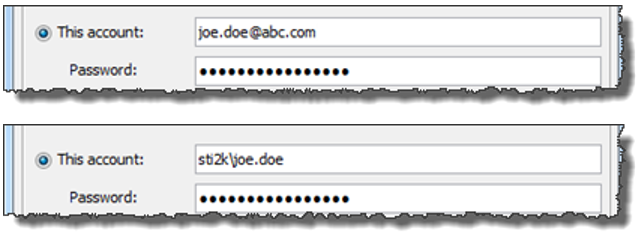
- Password: Type in the appropriate password for the account provided.
2.5. Allow TA Genie to access Repository
When installing TestArchitect (version 9.5 or higher), simply grant access to your repositories for TA Genie by enabling the checkbox Allow TA Genie to access Repository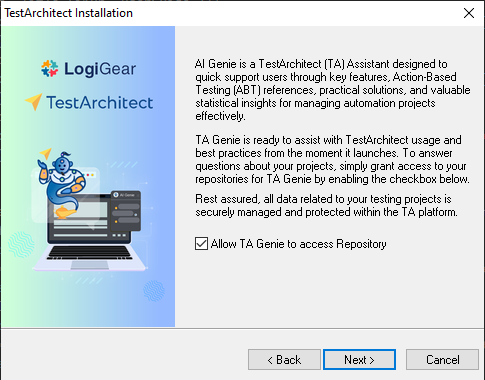
2.6. Click Next
Upon completion, the TestArchitect Installation Complete dialog box appears.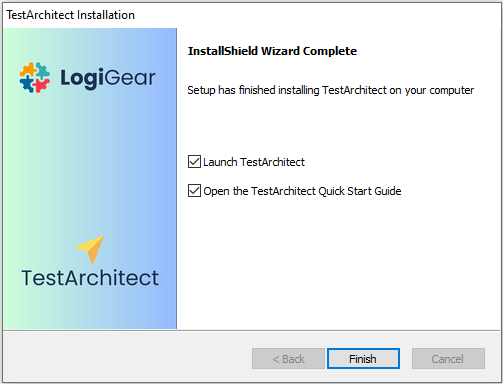
Using the check boxes of this dialog box, you may opt to launch TestArchitect immediately and/or open the TestArchitect Quick Start Guide.
2.7. Click Finish
TestArchitect setup is complete.
3. Installing License server
- It does not matter which order you install the license server or client first.
3.1. Check the License Server Port “8778” is ready or not
On the machine that installed the License Server, please check the port “8778” is exported properly with the following steps:
① Open Powershell on MS Windows
② Run the command:
test-netconnection <local IP address> -port 8778
③ Make sure that the command above run successful like the screenshot below:

If the command wasn’t successful, please configure the inbound and outbound port rules in the firewall of the License Server machine to expose port 8778. For more information, please refer to the article:
- Configure inbound port rule:
https://learn.microsoft.com/en-us/windows/security/operating-system-security/network-security/windows-firewall/configure#create-an-inbound-port-rule - Configure outbound port rule:
https://learn.microsoft.com/en-us/windows/security/operating-system-security/network-security/windows-firewall/configure#create-an-outbound-port-rule
3.2. Double-click the TestArchitectLicenseServer.exe installation file to begin the installation process.
The Welcome dialog box appears. This contains the license agreement specifying the conditions of TestArchitect software usage.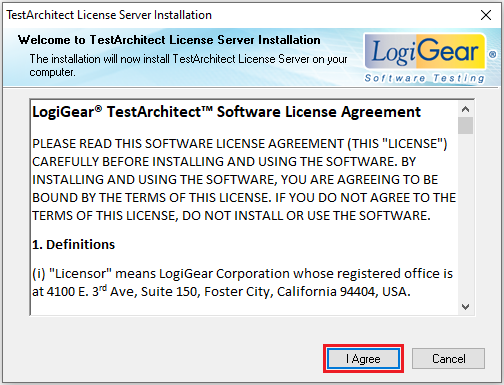
Read through the license agreement and then click I Agree to indicate your agreement with the license terms.
- When upgrading to newer version of license server, please uninstall existing version first.
3.3. Determine TestArchitect license server program and data location
- Use the Browse buttons to choose the program and data locations for the TestArchitect License Server or, alternatively, accept the default locations.
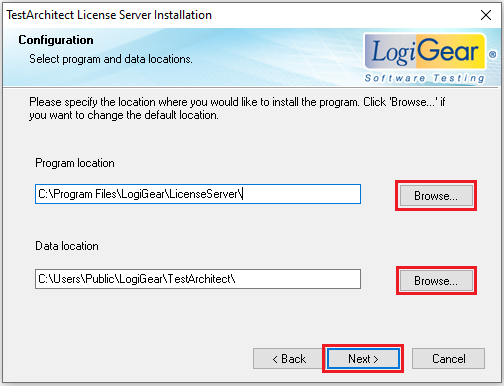
Click Next to continue.
3.4. On the Ready to Install the Program dialog box, click Install to begin installing the License Server.
The Setup Status message box appears to indicate the progress of the installation and the tasks being performed.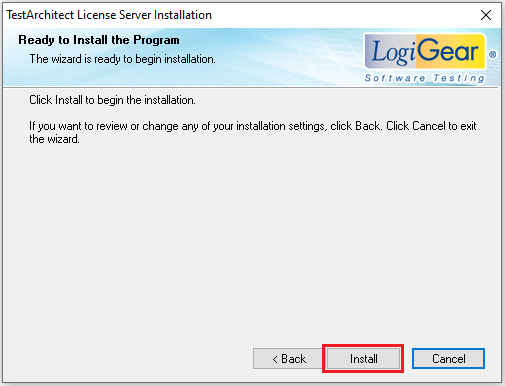
3.5. Upon completion, the Installation Complete dialog box appears.
Using the check boxes of this dialog box, you may launch the License Server immediately and/or open the License Server Help.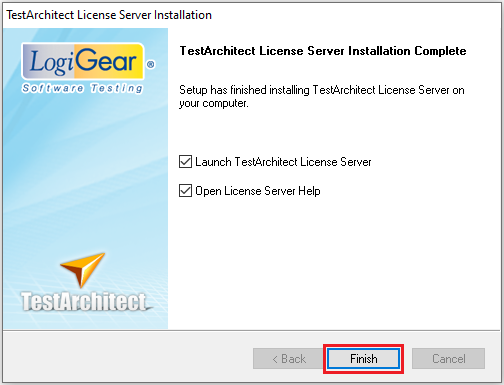
Click Finish.
3.6. Check the License Management Service Access (internet required)
① Make sure your PC connects to the internet.
② On the License Server machine, type a command on MS PowerShell:
test-netconnection license.logigear.com -Port 443
③ Confirm access result
If you see something like the screenshot below, you can confirm that the access is successful.

If the “TcpTestSucceeded” return False, you need to contact your IT department to help configuring the network to allow the License Server can connect to license.logigear.com via port 443.
When starting License Server at the first time, Windows Firewall may ask for allowing License Server access. Please press Allow access to allow License Server communication in your network.
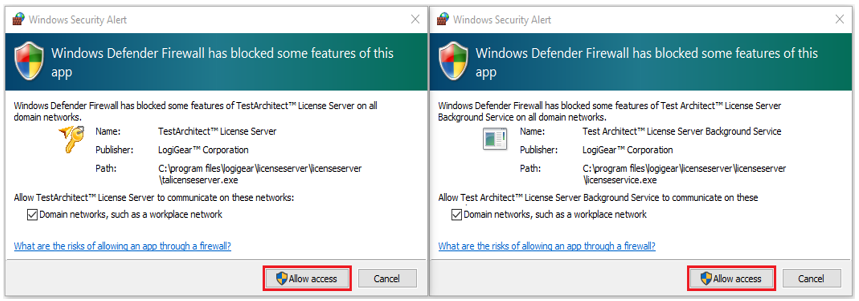
Remember to check if the 8778 port of your License Server machine is exposed. If not, please check the step 3.1 above. License server setup is complete.
4. License settings
4.1. License types
After installing the license server, you can purchase paid license or register free license to enable corresponding license type. There are 3 types of licenses:
- Free license: Trial
- Paid license: Enterprise and RunOnly
By setting the license information on the license server and the license server information on the TestArchitect client, you can use the product according to the license.
- The steps for registering an account for paid license are the same as those for registering a free license, but the authentication process will be different between online account and offline authentication license key
4.2. License authentication methods
The license authentication has 2 options:
- Online authentication: enter the username and password you set when registering an account on https://testarchitect.com
- Offline authentication license key: using separate license key
4.3. Setup subscription account on the license server
① Online authentication
Prepare the username and password you registered on https://testarchitect.com
On the PC where you installed the license server, start the License Server Control Panel by double-click the TestArchitect License Server icon. Or select [Start] menu > [All Programs] > [TestArchitect] > [License Server].
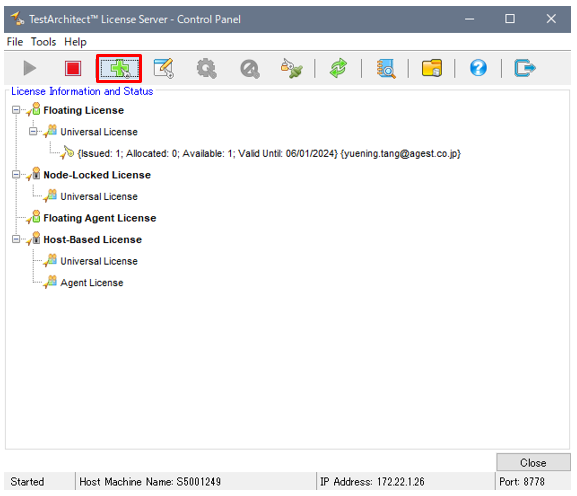
Add a license by clicking on the “Add License” button on the license server toolbar.
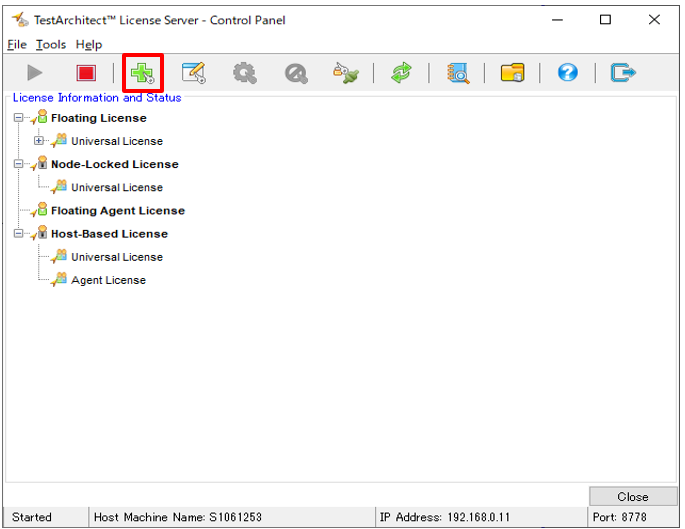
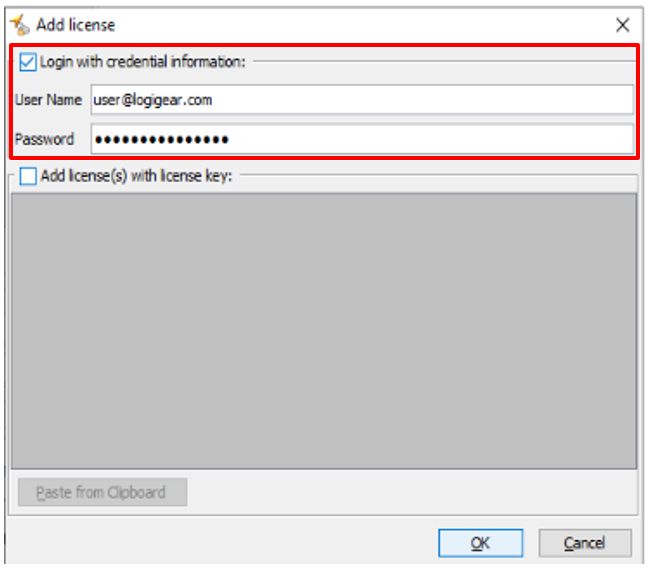
In the “Add license” dialog, select the “Login with credential information” option and enter your account information in the username and password fields
Click OK buttonNotes:- For paid license, after purchasing license for your account, the paid license (Enterprise/RunOnly) will be included in your account. The paid license information will display on the License Control Panel as well.
Once the license has been added successfully, you will see the license information on the License Control Panel

② Offline authentication license key
As the offline authentication license key is limited for selling, please contact TestArchitect sale representatives for necessary supports in advance.
This procedure requires LogiGear sale team to create an offline authentication license key
To have the offline authentication license key, you need to make a license request.
On License controls panel, click “Request License” toolbar button or select [File] menu > [Request License…] to open the “Request License” form.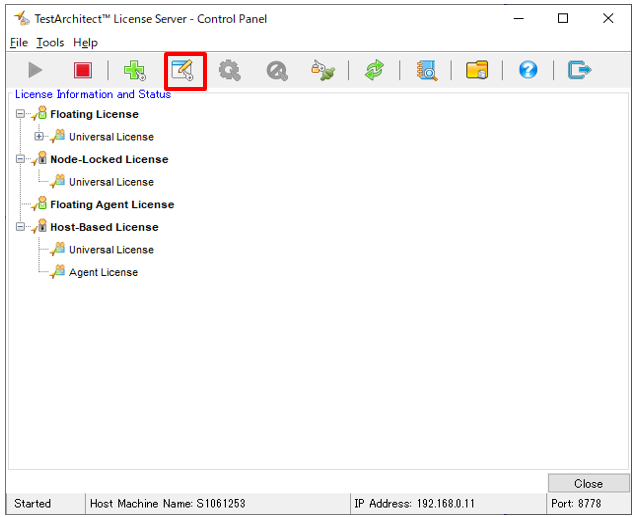
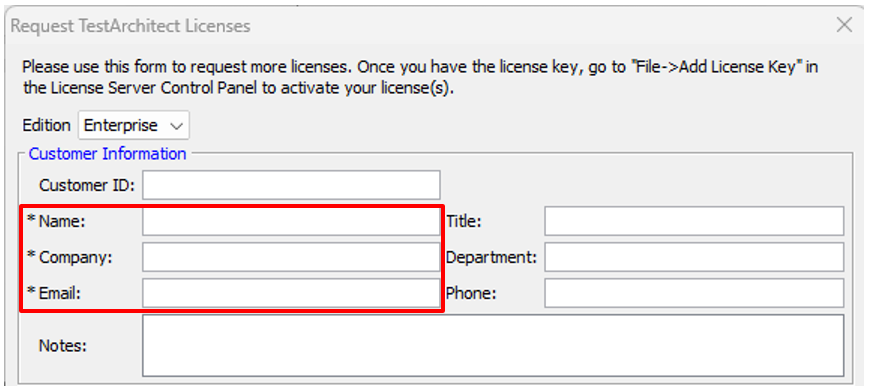
Fill in the required fields (*) on the “Customer Information” tab.
Notes:- Enter your user information (Name, Company name, Email address) you used to register your account on https://testarchitect.com
License Server Machine Name (FQDN) in “License Request Information” group is picked up and displayed by default. We recommended that user ask IT department at their end to create a FQDN for the license server to avoid VPN changes the TCP/IP address. Otherwise, if it is not available, the TCP/IP address will be displayed.
Notes:- Fully Qualifier Domain Name (FQDN) is displayed by default under format [ComputerName].[DomainName]
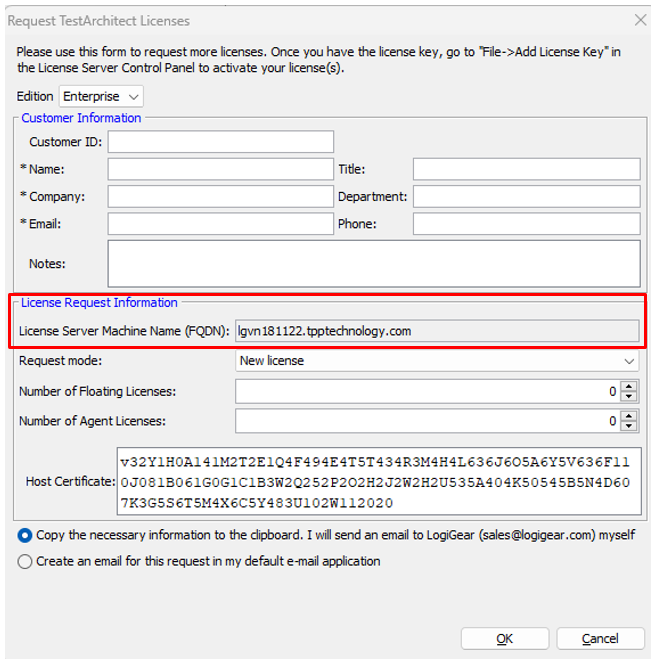
Provide number of Floating (Enterprise) or Agent (RunOnly) licenses according to the user’s need.
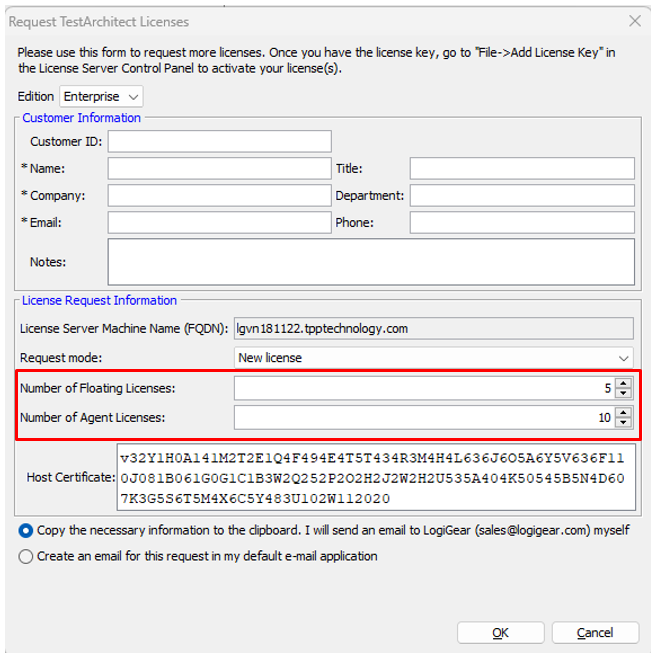
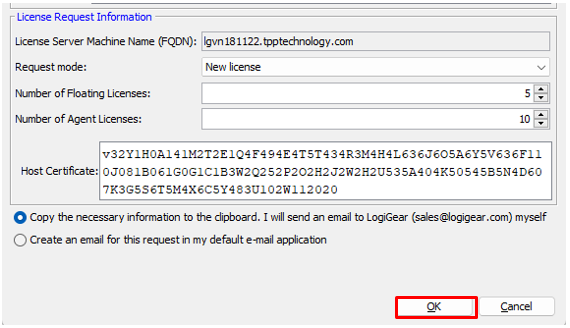
Press OK button to obtain the license request template. The template will be generated and copied to the clipboard.
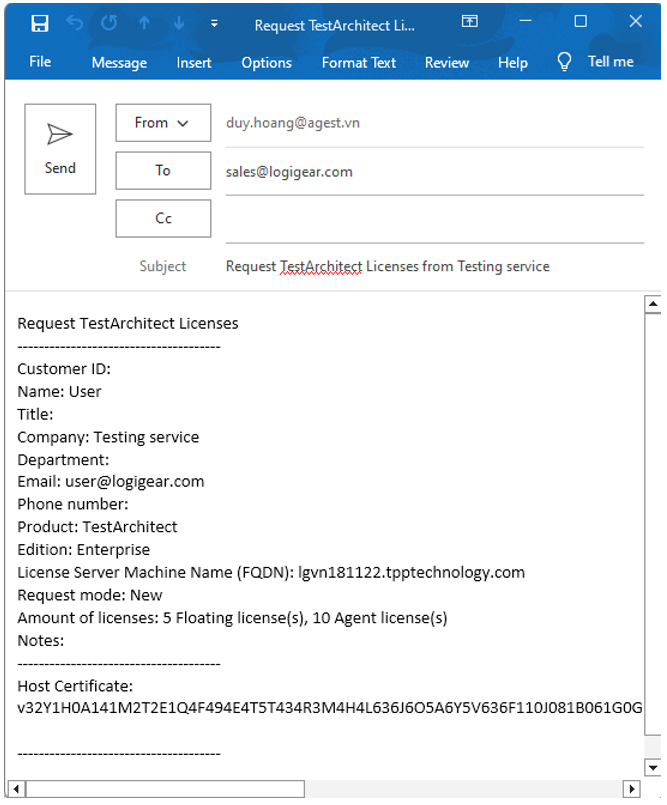
Please send an email to the LogiGear sales team with the information you have acquired.
LogiGear sale team will contact you in next response for your request email. If everything is ok, the offline authentication license key and installation guide will send to you.
Now, you can add offline authentication license key into the license server
Click on “Add License” button on the license server toolbar to open “Add License” form
Check the “Add license(s) with license key” checkbox and uncheck the “Login with credential information” checkbox.
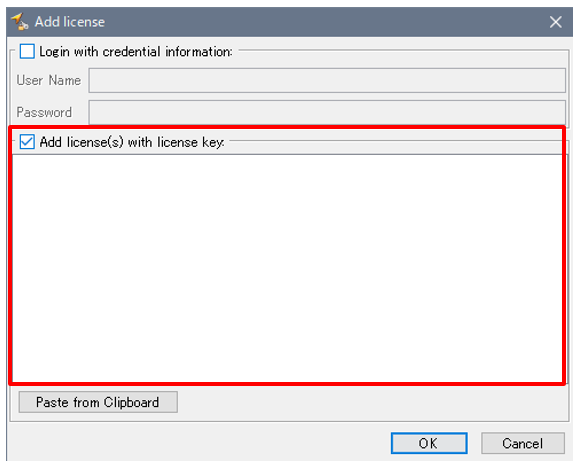
Copy and paste the license key you received from LogiGear staff in the text box below.
Notes:- Please notice that the license key is a string of characters. There is not any space at beginning and ending of string
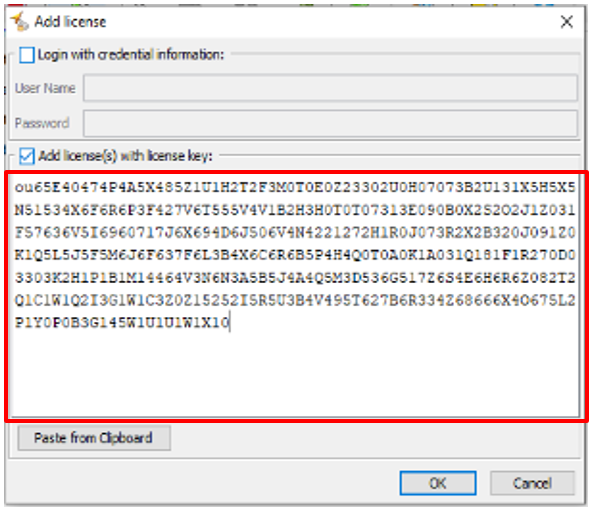
Click OK button. If successful, you will see a screen similar to the image below.
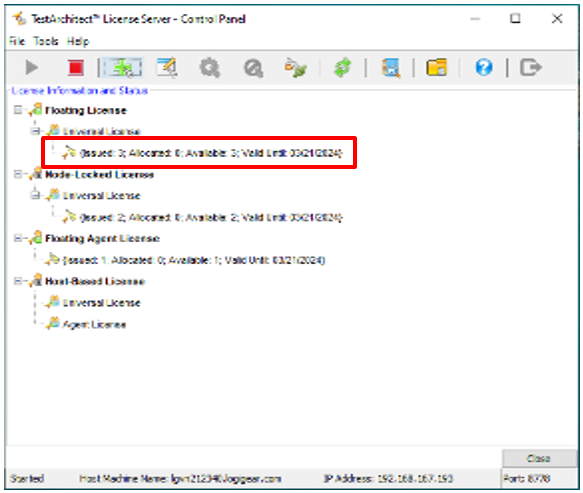
4.4. Connecting to the License server from TestArchitect client
- When setup the environment follows multiple PCs pattern, the TestArchitect client, License server, Repository server must be in the same Local Access Network (LAN)
① Enter license server information from TestArchitect client
From TestArchitect client, select [Help] menu > [License Server] > [License Information] to open “TestArchitect Licensing” dialog “TestArchitect Licensing” dialog will be displayed
- The “TestArchitect Licensing” dialog will be displayed automatically at the first time open TestArchitect client
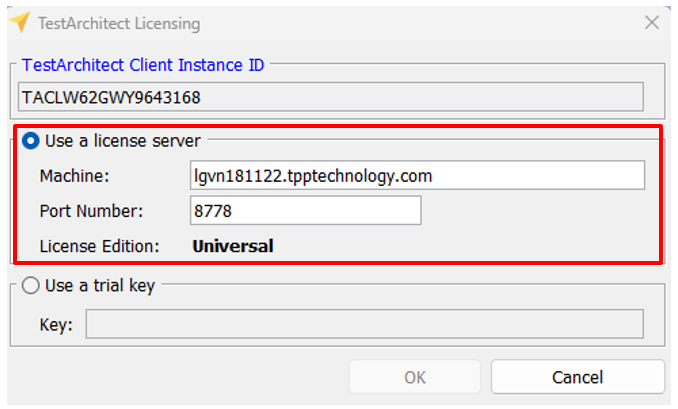
② Enter the address and port of the license server in “TestArchitect Licensing” dialog above
- The FQDN/ short Hostname (or machine name), TCP/IP address, and port number of the license server are displayed at the bottom of License server control panel
- Note: It is recommended to input the FQDN/short hostname (or machine name) instead of TCP/IP address to avoid VPN changes the TCP/IP address
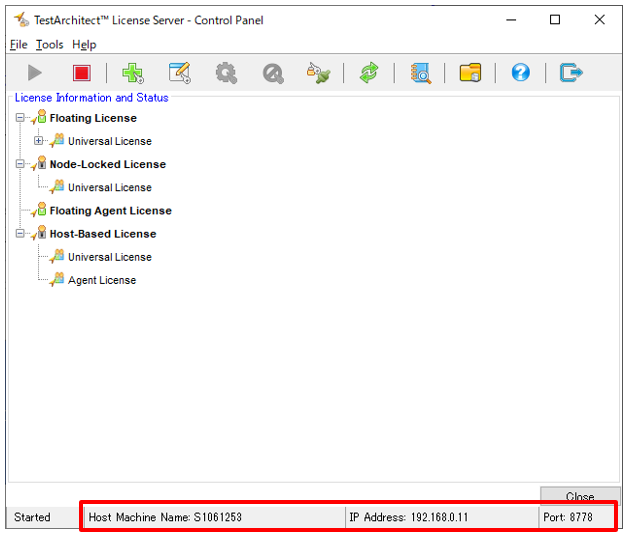
In example image, the information are:
Host Machine Name: S1061253
Port: 8778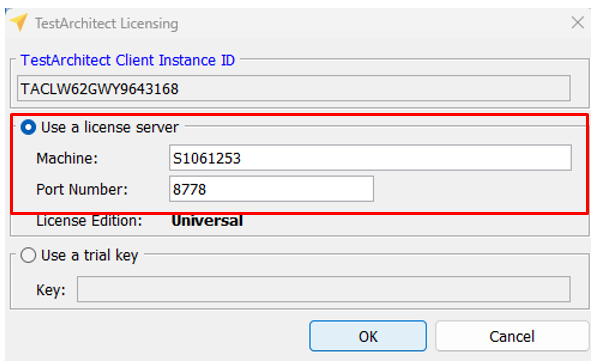
Once you have finished entering the license information, click on OK button and wait for the connection to response
③ When the connection between TestArchitect client and license server established successfully, the allocated license will be synchronized and displayed on the License server control panel.
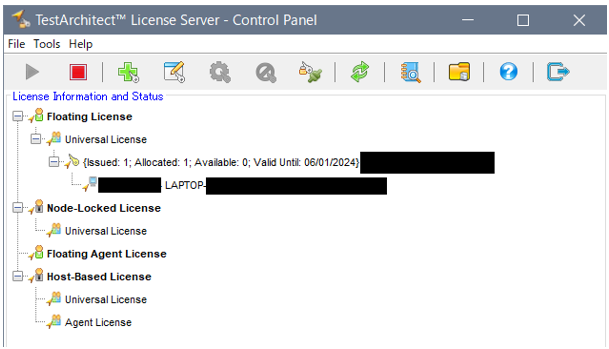
Now, TestArchitect client is ready to use.
5. Connecting to Repository server
5.1. Starting Repository server
Open Repository Server Control Panel on the PC where the Repository Server is installed.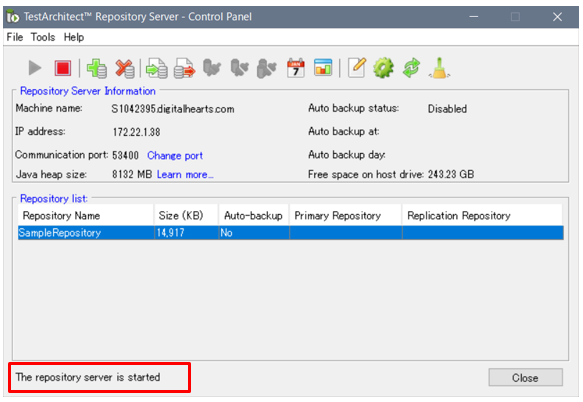
Here is the status started/stopped of Repository server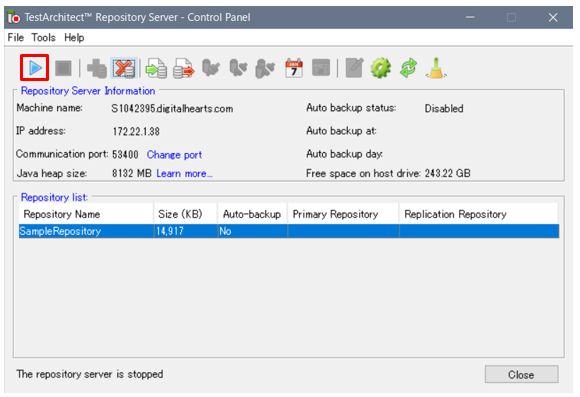
If it is not running, click the Start button to start the Repository Server.
Check that [The repository server is started] is displayed in the status bar.
If the connection is successful, these steps are not necessary.
5.2. Establishing a new connection to Repository server
On TestArchitect client, select [Repository] menu > [New Repository Connection…], the Repository Connection will be displayed
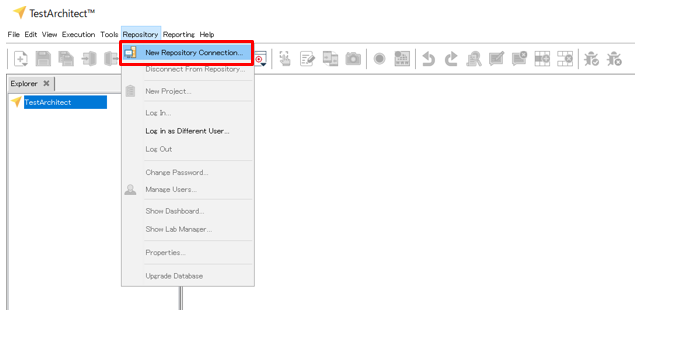
Alternatively, from the TestArchitect client dashboard, click [Connect to Repository], and the Repository Connection dialog will be also displayed.
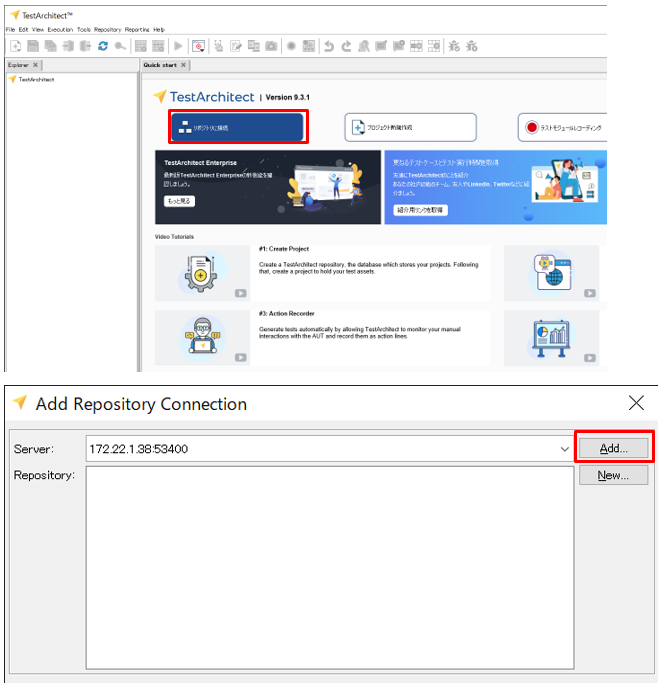
Click the Add button, and “Add Server” dialog will be displayed.
There are input fields for the server’s Host name and Port.
① Single PC pattern
If the TestArchitect client and the Repository Server are installed on the same PC, simply click the OK button with the default values to connect to the local Repository Server.
Host name: localhost
Port: 53400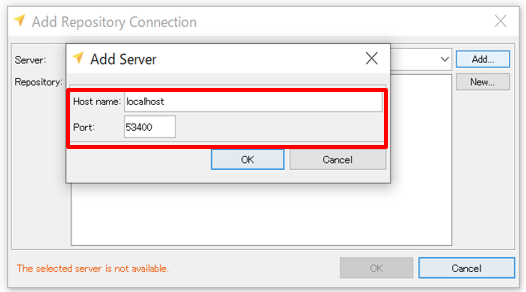 \
\
② Multiple PCs pattern
- When setup environment on multiple PCs, Repository server and TestArchitect client must be on the same Local Access Network (LAN)
As in example image:
Retrieve the Machine name (or IP Address) and port number of Repository server
Following is the Machine name (or IP address) and Repository server port number
Machine name: S1042395.digitalhearts.com
Communication port: 53400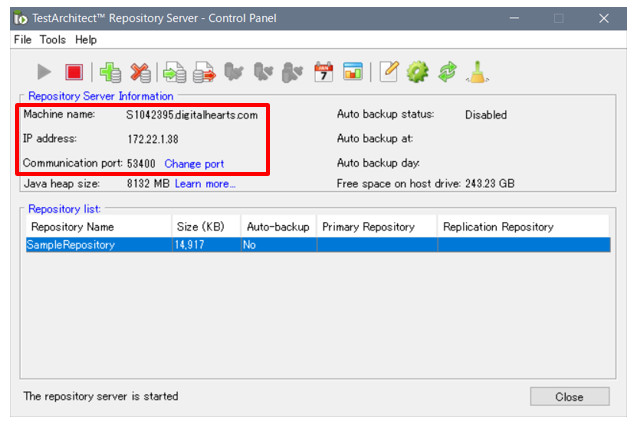
Add Repository server information in TestArchitect client
From TestAchitect client PC, enter Repository server machine name (or IP Address) and port number into “Add Server” dialog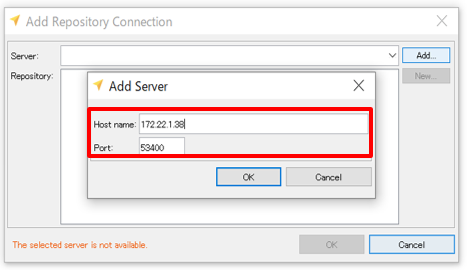 Notes:
- It is recommended to input the machine name instead of TCP/IP address to avoid VPN changes the TCP/IP address
Click OK button to start connecting to Repository server
If the connection fails, first ensure that the PC where the Repository Server and TestArchitect client are installed are on the same Local Access Network (LAN).
Also, ensure that port “53400” is available.
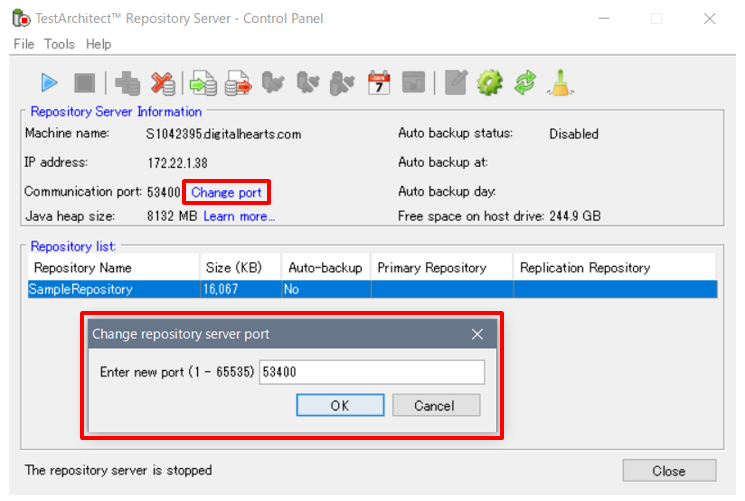
It’s also possible to change the default port number for the Repository Server.
Click [Change Port] in the Repository Server’s control panel and change the port number.Notes:- More info for TestAchitect default port number range:
https://docs.testarchitect.com/administration-guide/default-port-numbers-and-port-ranges/
You should be able to successfully connect to the Repository Server following the above steps.Repository server connection
In the “Add Repository Connection” dialog, a list of repositories on the connected server will be displayed.
Check the “SampleRepository” and click OK button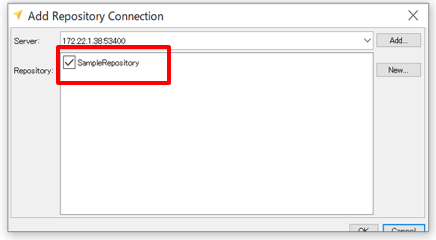
When the status of the sample repository is displayed as “Done” the sample repository will be available for use.
Click on “Close” button to close the “Connecting progress” dialog
5.3. Open Sample Repository
① Login into the SampleRepository
The SampleRepository will be displayed in the source tree on the left side of the TestArchitect client.
Double-click on it, and the login dialog will be displayed.
Click the OK button to log in.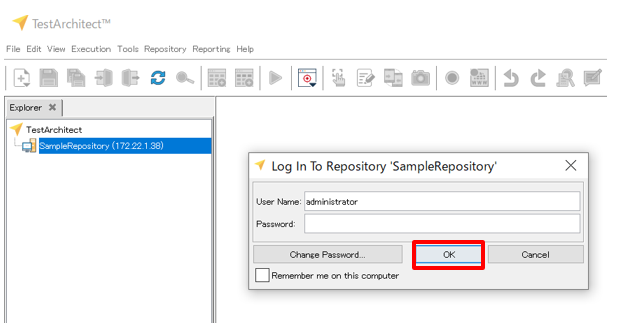
② Open a Test module in SampleRepository
Open the test module in the source tree of the SampleRepository.
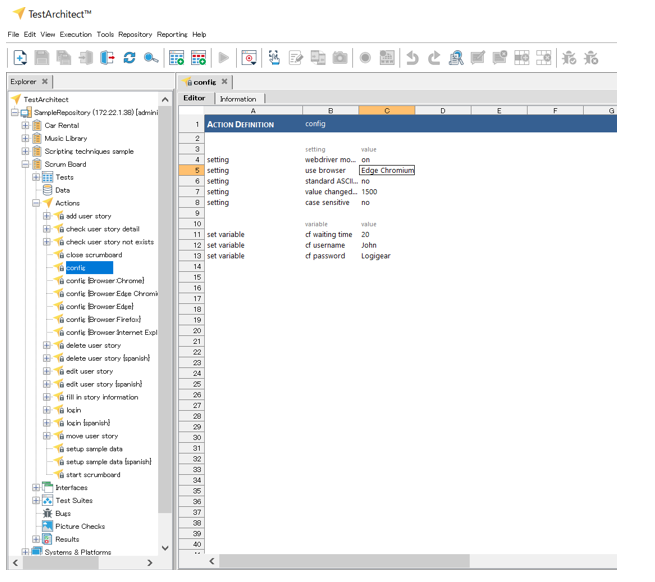
Once you can view the script in the Sample Repository as described above, all connection tasks are complete.
6. Initial setup
6.1. Display settings
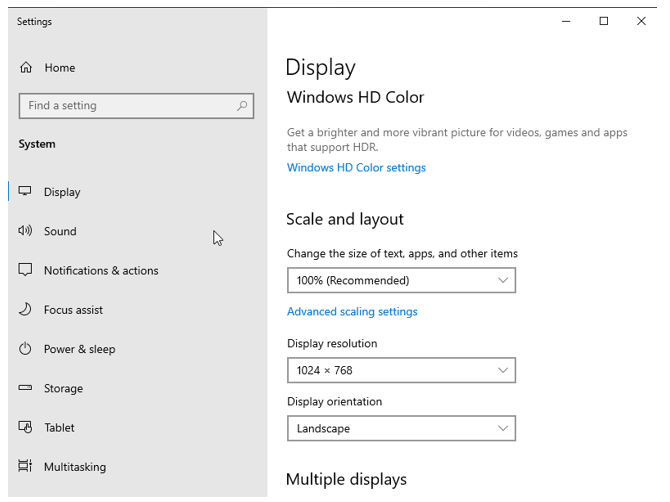
The display scale must be set to 100% for TestArchitect to run properly.
If set to a value other than 100%, deviations of object highlighting will occur when using Interface Viewer capturing interface elements or test execution interacts on the element not correctly.
① Right-click on the Windows desktop and select “Display Settings” from the menu that appears.
② Select “100%” for “Resize text, apps, and other items” and select the recommended resolution for the monitor itself (image example: 1920x1080) for “Display resolution”
- TestArchitect would not work properly on screens other than the main screen, such as second monitor screen.
- When using TestArchitect to execute the test, please work on the main screen
6.2. Preparing Google Chrome for web testing
Chrome employs remote debugging mode, a remote web inspector for debugging web applications, to which TestArchitect can interface. The upshot is that no agent or plug-in is needed for successful test development or execution on Chrome; the only requirement is that remote debugging mode be enabled.
① Configure Google Chrome browser
To ensure that automated web application testing in Google Chrome runs properly with TestArchitect, you first need to set some necessary command line switches.
If Chrome is open, close it, and terminate all running Chrome-related background processes, if any.
Right-click the Google Chrome desktop icon, and select Properties.
On the Shortcut tab in the Google Chrome Properties window, edit the contents of the Target text box. Append a white space to the existing command, followed by the following flags:
--remote-debugging-port=9222 --user-data-dir="C:\Users\Public\LogiGear\TestArchitect\chrome_dir" --no-first-run --disable-web-security --enable-views-textfield --force-renderer-accessibilityThe resultant command line string should look something like the following:
"C:\Program Files (x86)\Google\Chrome\Application\chrome.exe" --remote-debugging-port=9222 --user-data-dir="C:\Users\Public\LogiGear\TestArchitect\chrome_dir" --no-first-run --disable-web-security --enable-views-textfield --force-renderer-accessibility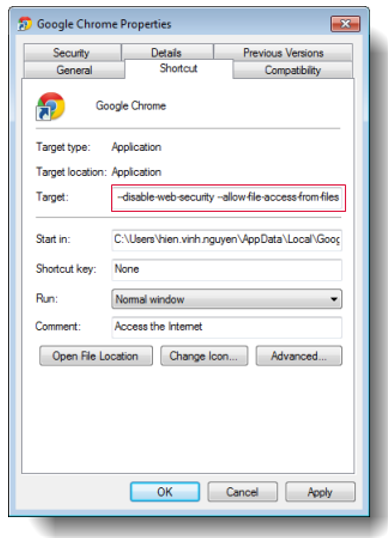
Notes: These flags have the following functions:
–-remote-debugging-port=9222:
Enable remote debugging mode over HTTP on the specified port (9222). This mode supports the functioning of the Interface Viewer and Identify tool to capture web controls, and allows for automated tests to run successfully on Google Chrome. This flag is compulsory and the most important; hence, ensure that port 9222 is always available.
–-user-data-dir:
Since Chrome version 136, Chrome made change to the behavior of –remote-debugging-port . The switch will no longer be respected if attempting to debug the default Chrome data directory. These switches must now be accompanied by the –user-data-dir switch to point to a non-standard directory.
–-no-first-run:
Skip First Run tasks, whether or not it is actually the first run. Specifically, this flag prevents first run in subsequent runs by dropping the First Run beacon, which may otherwise occasionally cause your automation to fail.
–-disable-web-security:
Turn off web security. This flag is required in order to support cross-domain testing.
–-allow-file-access-from-files:
Allow local file loading, so that Google Chrome is not inhibited from performing this action on the target machines. (Note that, for security purposes, the default is to prevent Chrome from loading local files.)–-enable-views-textfield:
Enables the Views text field in the Windows environment, ensuring that all controls in a JavaScript popup are available for detection and capture.–-force-renderer-accessibility:
Enable the debugging renderer accessibility feature. This flag is required to support testing in a multi-window session, in which more than one Google Chrome instance is open concurrently.Click OK button
Note: Depending on which version of Google Chrome is in use, the following warning may pop up each time the browser is launched:
This issue occurs for versions of Google Chrome that regard the –disable-web-security switch as unsupported. Note, however, that there is no impact on performance. As there is no simple way to avoid this popup, please ignore the warning and/or click the X button next to the message to close it.
(Optional) If you want to check which flags are currently enabled in Google Chrome, open the browser and navigate to the URLchrome://version/. The enabled flags are listed in the Command Line block.
② Setting 100% zoom on Chrome browser
TestArchitect requires that the browser zoom be set to 100% to correctly identify HTML controls and their positions on web pages.
Google Chrome uses 100% zoom by default. If you changed the zoom manually, you can restore it by doing one of the following:- Press Ctrl + 0 (Zero) to restore 100% zoom
- Click Chrome’s Customize and control Google Chrome
 button. From the drop-down menu, use the + or - button of the Zoom menu item to set the value to 100%.
7. Operation verification
After following steps in Initial Setup above, verify the setup is correctly by executing one test module in the SampleRepository.
7.1. Running the sample test module
Double-click to open the following test module in the TestArchitect source tree:
[SampleRepository] > [ScrumBoard] > [User Interface Tests] > [UI Elements]
Click on the execute button on the toolbar.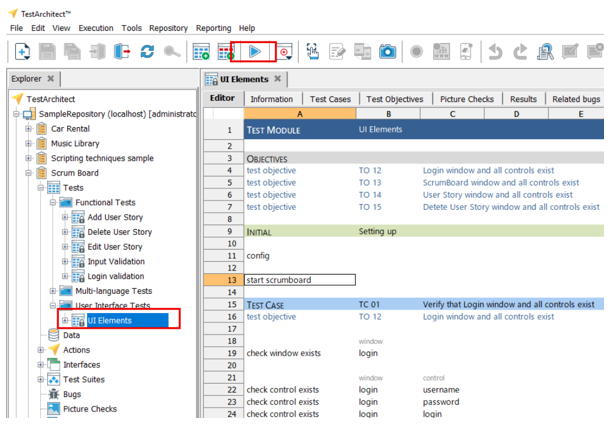
Then, select Chrome variation to execute.
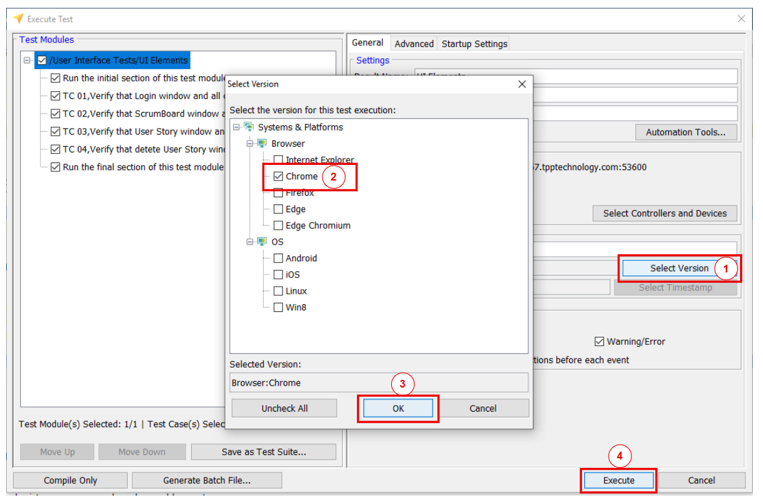
When starting the test, the web browser will automatically be opened and automation process will be executed.
7.2. Checking test result
The test result will be displayed as “Pass” if the setup has been done correctly
Otherwise, if the test result is not “Pass” (or “Fail”), please review the “Initial Setup” above.
8. Frequently Asked Questions for Troubleshooting
8.1. Tutorials
For basic usage of TestArchitect, please refer to the video at the URL below.
This video introduces how to create test modules, capture interfaces, and create test cases.
TestArchitect demo for Japan market:
https://www.youtube.com/watch?v=byN0ZpaSF98
8.2. Action Based Testing reference
A reference for built-in actions and settings used in TestArchitect
You can quickly search for an action you want to investigate, and it provides explanation of the action, how to use it with sample script, etc.
- Built-in actions reference https://docs.testarchitect.com/built-in-actions-reference/
- Built-in settings reference https://docs.testarchitect.com/built-in-settings-reference/
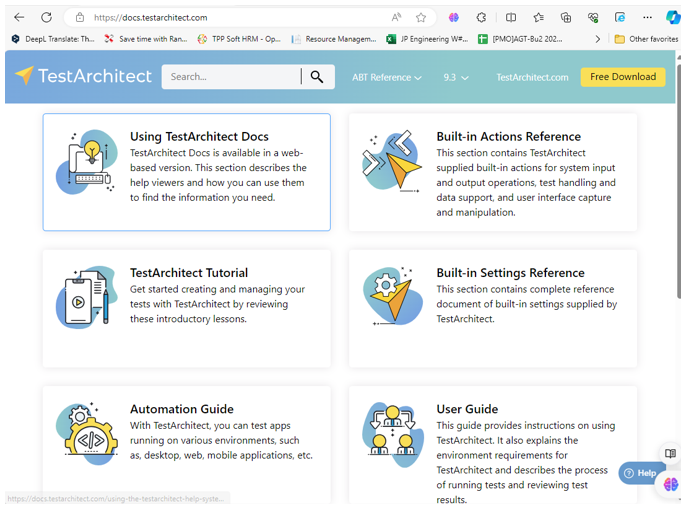
8.3. TestArchitect document
By entering keywords or a phrase into search field there would be a lot of information returned include tutorials, user guides, articles… related to TestArchitect.
Try it here:
https://docs.testarchitect.com/
- This is an English site, so please use your browser’s translation function to view it in other languages such as Japanese.
8.4. FreshDesk Support Ticket
You can ask your question on TestArchitect support system, the response speed would depend on your license is paid (Enterprise, RunOnly) or free (Trial). The Enterprise subscription will receive faster response than Trial subscription
Open your web browser and go to https://testarchitect.com, login with your registered account
① Post a ticket
After login, select [Support] menu > [Submit a Ticket] the Ticket submission will be displayed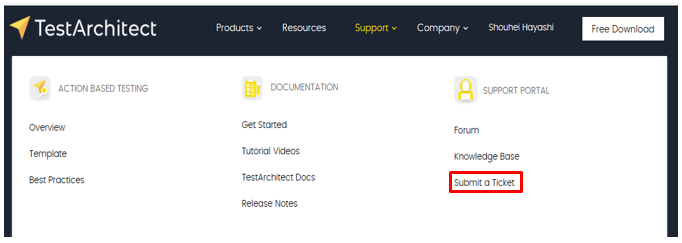
Enter your questions on the ticket submission screen and select the Finish button to send your questions.
Answers to your questions will be sent to you via email.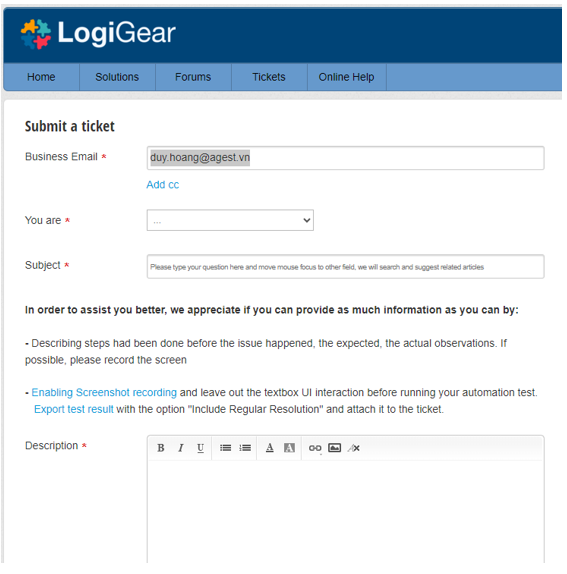
- Although the Ticket submission site is in English, the tickets you create can also be written in any languages
② Post questions to community forum
You can also post your questions in the community forum and get answers from members.
After login select [Support] menu > [Forum] to go to the community forum screen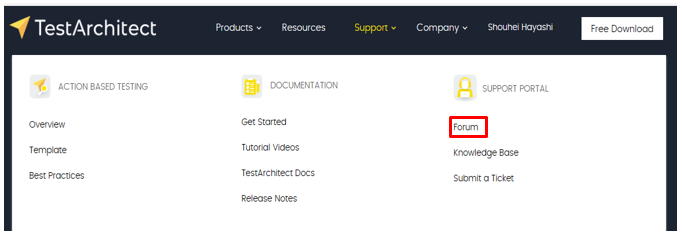
You can search topics or create a new topic for discussion with community. After entering topic content select the Finish button to post your questions.
You can get answers on the community forum screen.
- You need to be careful about what you want to post as posts in the community forum are public
- Although the site is in English, the posts you create can also be written in any languages
8.5. Common Q&A
There are some common questions and answer you might want to refer to when dealing with trouble
| No | Question | Answer |
|---|---|---|
| 1 | When starting TestArchitect while the network environment has changed, such as reconnecting a VPN, the following error might be displayed and it cannot be executed. How can I recover from this? | If the network environment changed, such as reconnecting the VPN, and it causes the IP address to change You will need to re-login to the License Server. Please check the following procedure to restore the system: (1) Open the license server. (2) Log out the current account. (3) Log in again with the account. (4) From the TestArchitect application, connect to the license and check if it works. |
| 2 | Is the license counted per person or per terminal? (We do not have a dedicated QA person in our company and it is envisaged that developers will use the system sporadically). | The website says that it is purchased per developer, but it means per terminal. It is possible for several people to take turns using one Enterprise terminal to create test cases, or for one RunOnly terminal to run test scenarios for several projects with different people in charge. |
| 3 | Is it also OK to run tests developed with the TestArchitect Trial version with RunOnly? | You can use RunOnly license to execute the tests developed during the License Trial period via batch file (learn more). However, please note that when Trial License is expired, it is not able open TestArchitect client to review or update the developed tests any more. |
| 4 | Is it possible to use multiple accounts under one automated environment? | Multiple accounts cannot be used on one license server. If multiple devices are used, multiple licenses must be purchased for one account. |
| 5 | An error occurred when using the TestArchitect web recorder function. Similarly, an error occurs when executing with the browser-based test module. Is there a cause or a way around this? | The problem is probably caused by the WebDriver version not being up-to-date. Follow the steps below to set the latest WebDriver in the TestArchitect Automation Agent Manager screen: Open the TestArchitect Automation Agent Manager screen as follows: TestArchitect main menu bar > Tools > Automation Agent Manager For more information, please see below: https://docs.testarchitect.com/automation-guide/application-testing/testing-web-and-ria-applications/testing-web-applications/automated-web-testing-with-webdriver/configuring-webdriver-server-amp-client/ |
| 6 | How can I install the free version of TestArchitect? Will the free and paid versions have different installers? | The installers for the free and paid (Enterprise) versions of TestArchitect are identical. The Enterprise version can be used by registering the purchased account on the license server. |
