Capturing new images
How to capture new images and save them for use as reference images for future picture checks.
Launch the AUT and navigate to the window or function that displays the picture of interest.
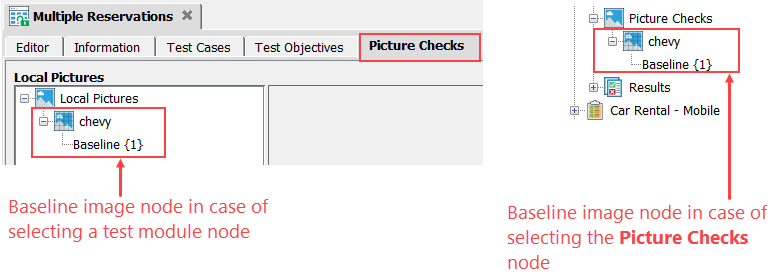
In the TestArchitect explorer tree, select a test module node, or the Picture Checks node. You can also select a subfolder node residing under the Picture Checks node.
Important:- If the Picture Checks node or its subfolder is selected at the time of capture, the captured image is saved to the Picture Checks node. This captured image is shared across various test modules in a project (see Picture checks for more details).
- If a test module is selected at the time of capture, the captured image is saved as a regular picture check and this regular picture check is only available within the selected test module. You can view the captured image in the Picture Checks tab (see Picture checks for more details).
Click the Picture Capturing Tool
 button on the toolbar, or select Tools > Capture Picture.
TestArchitect is minimized and your cursor changes into a crosshair icon, indicating that capture mode is now active.
Tip:In capture mode, the following options are available to you:- Click Esc to exit capture mode and return to TestArchitect, or
- Hold Ctrl on your keyboard to tell the system not to interpret a mouse click as the start of an image capture. This frees you to use your mouse to navigate to another window before initiating the capture.
Pick the area of the screen that you want to capture by dragging the cursor around an object to form a rectangle.
Note that, as you drag the mouse to specify the area of capture, a red, rectangular border appears.
When the selection rectangle covers the area of capture that you want, release the mouse button.
In the Capture Picture dialog box, enter detailed information for the new baseline:
- Picture name: Specify a unique name for the picture.
- Location: (Optional) Leave as default, or click
 to save the picture to another location.
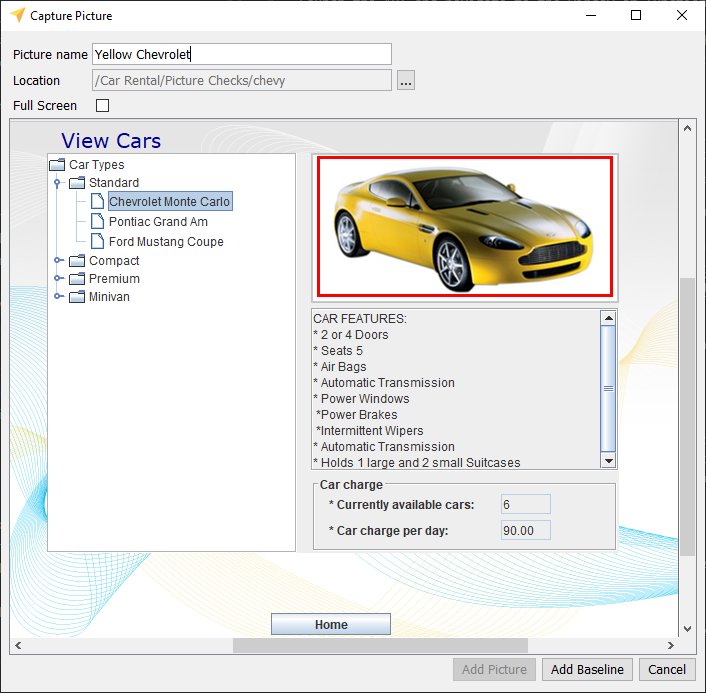
Tip:- You can make further adjustments to the boundaries of the capture area by clicking and dragging the edges of the red rectangle within the dialog box.
- To select the entire captured image, select the Full Screen check box.
Click the Add Picture button.
Based on what you selected (that is, the test modules node, or the Picture Checks node), the capture of the image results in a parent-child pair of nodes being created within the Pictures Checks tab of the test module, or within the project’s Picture Checks node. The parent node, which represents the picture check, is given the name you assigned in the Capture Picture dialog box. Its child is assigned the name Baseline {1}, the first of what ultimately could be several baseline images for that particular picture check.