
Interface entities and elements
TestArchitect interfaces are implemented with interface entities and interface elements. These project items identify the windows and controls of an application’s user interface, and assign TA names to them.
As you’ve seen, TestArchitect interfaces are composed of interface entities and interface elements. These project items are used to assign user-selected TA names to UI elements of the AUT. An interface entity is used to map a window to a TA name, while each interface element does the same for a control. Now we’ll have a look inside these two types of project items.
An essential aspect of a given mapping is that the UI element be uniquely identified. During automation playback, it is important that every window to be tested be uniquely identifiable among all the other open windows on a system, and that every control be uniquely identifiable among other controls of the same class and in the same window. That is, the means by which an interface entity identifies a given window must ensure that it points to one, and only one, window, and the same goes for interface elements and controls.
Every UI element of an AUT has both a class and a set of properties. Property sets vary depending on the class of object involved: a button, for example, will have a different set of properties than that of a textbox or window. TestArchitect identifies each UI element based on:
- its class,
- one or more of its properties and their values (property-value pairs) and,
- in the case of a control, the window in which it resides.
Interface entities
An interface entity, when opened in TestArchitect Client, appears as a worksheet in the test editor. It acts as a container for two types of actions: interface entity setting actions, which appear at the top, and interface element actions.
Aside from its function as a container, the interface entity also maps a TA name onto an AUT window. The first part of that mapping is accomplished by the naming of the interface entity itself – that is, the name you give to the interface entity becomes the TA name representing the associated AUT window.
The interface entity setting actions contained within the interface entity handle the other side of the mapping – that is, they serve to identify the AUT window. Each interface entity setting action has two arguments: a property followed by a value. These property value pairs are used to identify the associated window so that the automation can easily find it during playback. In most cases, an interface entity only needs a single interface entity setting action. If more than one is used, then the interface entity is mapped to a given window only if all of the property-value pairs match.
The red arrows of the following figure illustrate how the TA name login is mapped to the Car Rental-Login window of the AUT.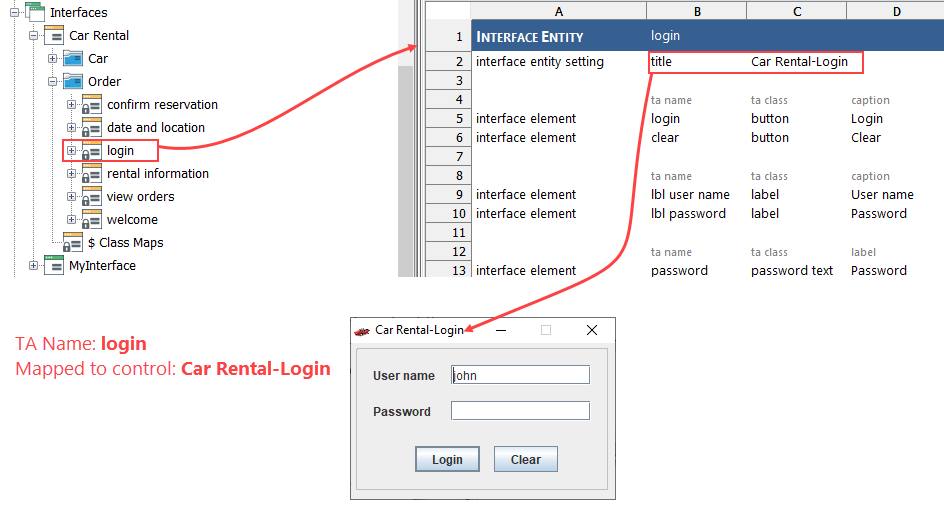
The first line of the worksheet above establishes a TA name of login for this mapping. (This line is automatically inserted upon creation of the interface entity, and is not editable.) The interface entity setting action on row 2 establishes that the TA name is to be associated with the window whose title property has a value of Car Rental-Login.
Because of these first two lines, for any tests using this interface, TestArchitect automation will recognize that any actions with a window argument of login are targeting the Car Rental-Login window.
Interface elements
An interface entity worksheet is usually populated with several interface element actions. Each interface element maps a logical TA name to a control that exists in the given window (that is, the AUT window specified by the interface entity). Controls are typically identified by a combination of their containing window (interface entity), TA class, and one or more property-value pairs. Tests can then use these TA names in actions to interact with target controls.
An interface element action is similar in function to the interface entity setting action, but provides more information explicitly. First, it specifies a TA name for the associated control. It also specifies a TA class, to help identify the control. (For an interface entity setting action, TA name and TA class are implicit.) Finally, it specifies one or more property-value pairs to further identify the control. (By contrast, a separate interface entity setting action is required for each property-value pair to be specified.) The only information that is implicit for an interface element is the identity of the containing window, which is given by the interface entity that the action exists within.
The red arrows of the following figure illustrate how the TA name clear-button is mapped to the Clear button in the login window of the AUT.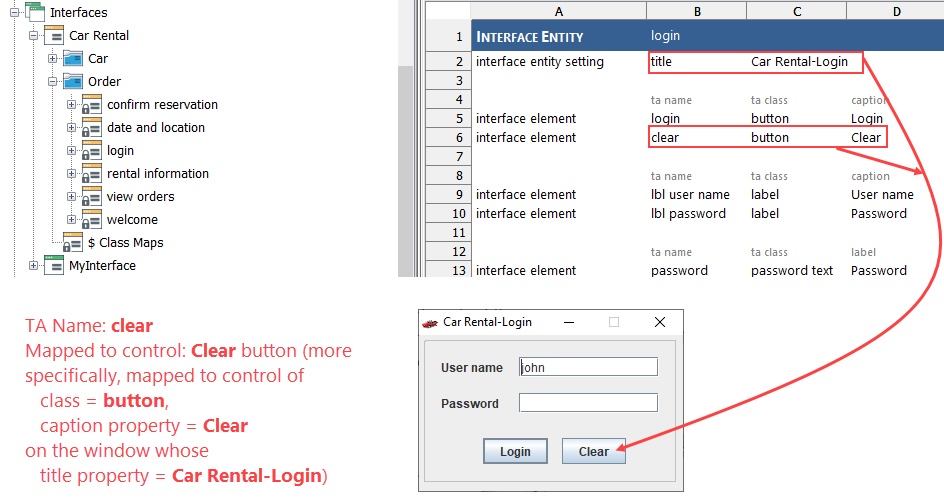
First, the containing interface entity’s mapping (line 2) establishes that the control in question is on the Car Rental-Login window. On line 11, the first argument of the interface element action specifies that the control is to be mapped to the TA name clear-button. The next two arguments establish that the target control is of TA class button, and has Clear as the value of its caption property.
Regular Expressions
It may sometimes be the case that some identifying property of a window or control may not be static – that is, it can vary from one time to the next, based on the state of the application. Often, however, there may be some identifiable consistency in all of the possible values that the property may take on. In such cases, regular expressions can often be used to reliably identify every possible value of that property of the control. Hence, TestArchitect accepts regular expressions as property value arguments in both interface entity setting and interface element actions.
As an example, say the browser tab for a web-based email application displays text that consists of both a constant, known portion (“Inbox”), along with information that is variable, such as the number of currently unread emails:
As it happens, the contents that the browser uses for the tab display are taken from the doc title property of the HTML page, which is also the property most often used by tests to identify a window. Hence, in order to use this property in the interface entity, it is necessary to account for the variable portion of its contents. This can be done with a regular expression that uses a simple wildcard.
In TestArchitect, curly braces {} are used to indicate that a regular expression is included in the contents of a cell. And the two characters .* are the standard regular expression symbol for a wildcard, meaning “match any contiguous set of characters”. So to ensure that TestArchitect can find this HTML page, our interface entity might be headed by the following:
interface entity setting doc title {Inbox.*}
Note, however, that this will match all HTML pages with doc title values beginning with the string “Inbox”. If more restriction is required – say, to all email addresses at the given domain – you might use:
interface entity setting doc title {Inbox (.*) - .*@logigear.com}
Related concepts
Identifying interface elements and controls
Related tasks
Creating interface entities
