
Uploading TestArchitect test modules/test cases to Quality Center
TestArchitect test modules and test cases can be uploaded to Quality Center which establishes one-to-one mappings between TestArchitect test cases and Quality Center tests.
Ensure that the machine hosting the TestArchitect repository server has the HP ALM Connectivity Add-in installed, to allow for integration and synchronization between TestArchitect and HP Quality Center.
Ensure that you have already taken the following steps:
- Registered the Quality Center server with TestArchitect.
- Mapped the TestArchitect project containing the test cases of interest to the Quality Center project.
TestArchitect relies on test modules that are typically developed and executed as standalone units. Each test module is comprised of a sequence of test cases. By contrast, the standard unit of test development and execution in Quality Center is the test, which more closely corresponds to a test case in TestArchitect than a test module. Hence each uploaded TestArchitect test case takes the form of a Quality Center test. In general, the following correspondences are used when moving test assets between the two systems:
| TestArchitect | Quality Center |
|---|---|
| Test folder | Folder (with subfolders representing TA test modules) |
| Test module | FolderOptionally, a ‘#’ test (QC test with ‘#’ prepended to the name) may also be created to hold essential test module metadata. |
| Test case | Test |
To upload TestArchitect test modules/test cases to Quality Center, carry out the following steps:
In the TestArchitect explorer tree, right-click the Tests node, a test folder node, or a test module node to upload, and then click External Tool > HP ALM > Upload to Quality Center .
Notes:TestArchitect entities whose names contain special characters (see below) can not be successfully uploaded to Quality Center. Ensure that you avoid these special characters when naming TestArchitect test folders, test modules, and test cases.
Prohibited characters:
For TestArchitect test folders:
Asterisk * Caret ^ Backslash \ For TestArchitect test modules/test cases:
Apostrophe ' Quotation mark " Percent % Greater than sign > Less than sign < Asterisk * Colon : Question mark ? Backslash \ Slash mark / Pipe |
Should you upload a test module variation whose name is in the form of
<default definition name>{<System>:<node1>, <node2>} {<keyword1>, <keyword2>}, TestArchitect automatically replaces the colon character (:) with an equal sign (=).For example, uploading test module variation
Multiple Reservation \{Browser:Internet Explorer\} \{Spanish\}from TestArchitect, results in a name of
Multiple Reservation \{Browser=Internet Explorer\} \{Spanish\}in Quality Center.
TestArchitect may ask you to enter the Quality Center password for the logged-on user. If so requested, enter the password and click OK. A dialog box appears, displaying the Quality Center folder tree for you to select a target folder from.
On the Upload Test Module dialog box, select the target folder in Quality Center to which you want to upload the test module/test case.
Tip:- It is recommended that you upload TestArchitect tests into a Quality Center test node with similar node structure.
- You can change the setting that governs whether TestArchitect uploads the same test automatically to Quality Center next time you request an upload by disabling the Upload Test Module dialog box. Refer to Turning on/off automatic uploading.
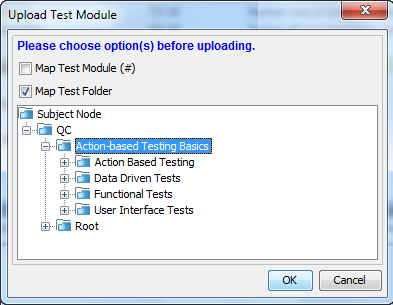
Select the Map Test Module (#) and/or Map Test Folder check boxes, which determine exactly what items are created on the Quality Center side:
Map Test Module (#): Upload TestArchitect test modules as #tests to Quality Center.
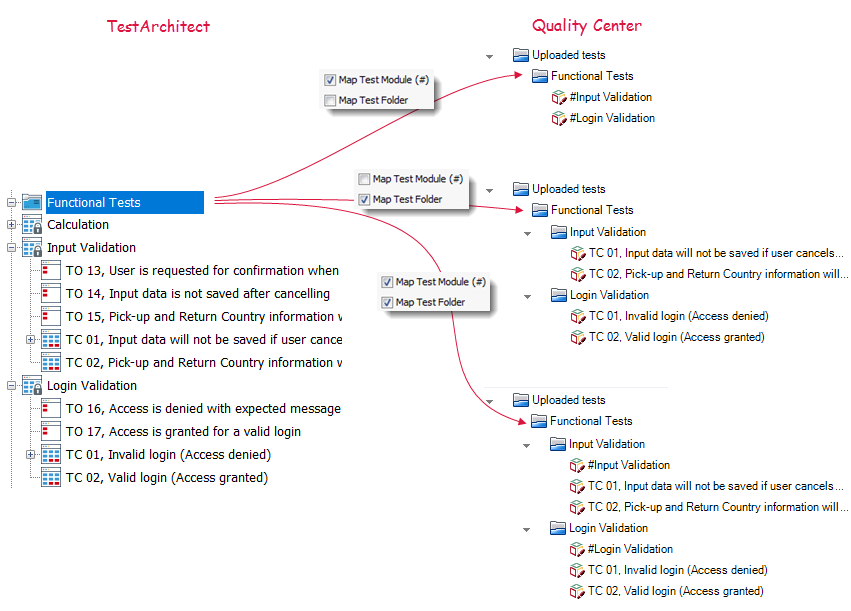
An uploaded TestArchitect test module results in the creation of a Quality Center test with the same name, but prepended with a pound sign (#). For example, an uploaded test module named Input Validation appears as #Input Validation in Quality Center.
Map Test Folder: Upload TestArchitect test modules to Quality Center as folders of the same name (no prepended #); upload test cases as tests of the same name, contained within the associated folder.
Note that, in all cases, the test folder structure of the uploaded TestArchitect explorer tree node is replicated on the Quality Center side. The following figure displays the results of three separate uploads of the Functional Tests test folder to the Uploaded tests folder of Quality Center, each with a different set of upload options in the Upload Test Module dialog box. (Note that uploading with neither check box selected is prohibited.)
Click OK to upload.
If the upload to Quality Center is successful, a message box to that effect is displayed.
The selected test module or test case is uploaded to Quality Center, which can be viewed as a test node on Quality Center’s ALM sidebar Testing > Test Plan.
Note that the upload process triggers versioning for every affected test in Quality Center. For each test, more than one version may be archived at different stages during this process, with the test’s Version Number incremented accordingly.
The following topic describes how TestArchitect test module and test case information is mapped to the corresponding Quality Center tests.
Mapped items between TestArchitect and Quality Center
This topic describes how TestArchitect test module and test case information is mapped to the corresponding Quality Center test fields.
Turning on/off automatic uploading
Controlling whether or not TestArchitect uploads tests to Quality Center automatically.
