
Creating matching custom fields
User-defined fields in TestArchitect are automatically mapped to their counterparts in Quality Center, when such counterparts exist.
A TestArchitect user-defined field and Quality Center user field are considered to be counterparts when they meet all of the following criteria:
- their names are identical;
- their data types are compatible;
- each field exists on an entity that is an analog of the other (e.g., TestArchitect test case and Quality Center test).
During uploads and imports, the values of these mapped fields are kept in sync. The values of user-defined fields created in TestArchitect are loaded into their counterparts in Quality Center whenever test modules or test cases are uploaded to Quality Center. Likewise, the values of user fields in Quality Center are loaded to their corresponding user-defined fields in TestArchitect, whenever Quality Center tests are imported into TestArchitect.
To create matching user-defined fields in TestArchitect and Quality Center:
Create a user-defined field in TestArchitect . Ensure that you correctly define the properties for the field, as described below, so that it can be mapped to the user field in Quality Center.
- Name: The name of the TestArchitect user-defined field must be identical to that of its corresponding user-defined field in Quality Center.
- Apply To: Only Test case, Test module, and Result are mappable to Quality Center user fields. See TestArchitect and Quality Center Entities table for details.
- Value Type: Data types must match between TestArchitect and Quality Center. See TestArchitect and Quality Center Data Types table for details.
- Default Value: Assign a default value to a user-defined field. Note that it is essential that this field be defined when mapping to a required field (see Required check box in step 2.d in Quality Center).
Important:For a TestArchitect field that is mapped to a Quality Center field marked as Required, it is essential that a value must be provided in the Default Value field.Create a user-defined field in Quality Center that matches a user-defined field in TestArchitect:
Notes:Please note that the following instructions on creating a custom field in HP Quality Center are provided for your convenience, and are not guaranteed to address changes that may occur with new updates to the application. If in doubt about any of the steps, please consult the Help documentation provided with Quality Center.If using Quality Center 11, select Customize from the Tools menu; or, in Quality Center 12, select Customize from the Settings
 icon:
icon: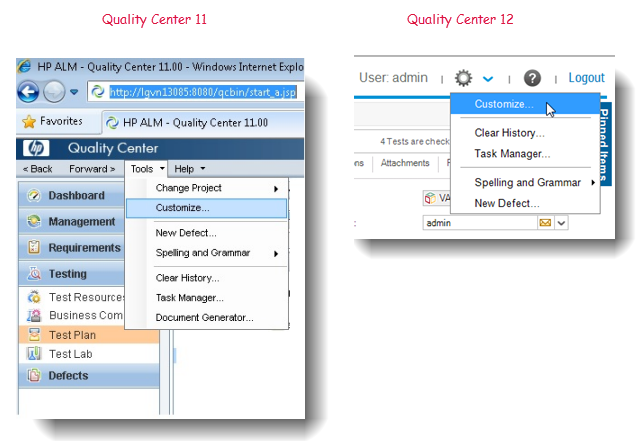
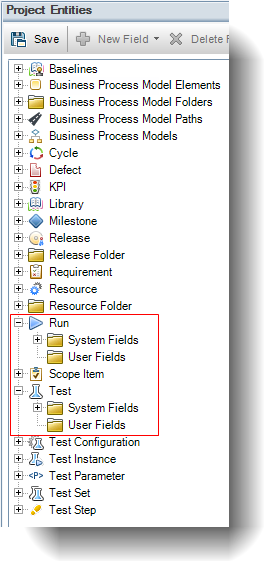
In the Project Customization screen, select Project Entities, and then select either the Test > User Fields or Run > User Fields node, depending on the Apply To entity selected for the corresponding user-defined field in TestArchitect. If you chose Test case or Test Module in step 1, select the Test > User Fields node on the Quality Center Project Entities tree. If you chose Result in step 1, select the Run > User Fields node.
Click New Field
 on the toolbar.
On the Settings tab, enter the information for the user field as required. Be sure to choose the correct values for the fields described below as they will affect how user fields are mapped between TestArchitect and Quality Center, and when an error message is displayed.
- Label: The name of this Quality Center label must be identical to the name (defined by the Name field) of the user-defined field created in step 1.
- Type: This Quality Centerdata type must match the corresponding TestArchitect data type (defined by the Value Type field) when creating the user field in step 1. Mapped fields must have compatible data types, as specified in the TestArchitect and Quality Center Data Types table.
- Required: Select this check box to indicate that a value for the field is mandatory. When user field-mapping cannot be achieved between TestArchitect and Quality Center, such as when the corresponding TestArchitect defined field’s value is empty, TestArchitect displays error messages and terminates the uploading process.
Click Save
 on the toolbar.
In order for Quality Center to receive and display user-defined fields from TestArchitect, the test module or test case containing the user-defined fields must be uploaded to Quality Center. An additional step is required for viewing TestArchitect Result entities in Quality Center: the test module or test case containing the user field Result entities must be executed. (Note that this additional step is not required for viewing Test module or Test case entities.)
To view Test module or Test case user-defined fields in Quality Center:
- In Quality Center’s ALM sidebar, navigate to Testing > Test Plan.
- In the Test Plan window, navigate to and select the test module or test case containing the user fields you want to view.
- User fields for the selected test module or test case are shown on the Display tab.
To view Result user-defined fields in Quality Center:
- In Quality Center’s ALM sidebar, navigate to Testing > Test Lab.
- On the Test Runs tab, select the test run containing the Result user fields you want to view.
- User fields for the selected test run are displayed in the Run Details window.
Rules for mapping custom fields between TestArchitect and Quality Center
Mapping is driven by field names. Fields in Quality Center and TestArchitect are mapped to each other automatically when a), their names are identical, b), their data types are compatible, and c), the TestArchitect Apply To entity is matched properly with the Quality Center Project entity. When uploading from TestArchitect to Quality Center, values fromTestArchitect user-defined fields are loaded into their corresponding fields in Quality Center. Likewise, values from Quality Center custom fields are loaded into the corresponding TestArchitect user-defined fields when importing tests from Quality Center to TestArchitect.
Custom fields: Example #1
This example demonstrates the steps involved in mapping a custom field in TestArchitect to a custom field in the Quality Center TEST table.
Custom fields: Example #2
This second example explores the steps involved in mapping to custom fields in the Quality Center RUN table.
Creating a custom test objective field in Quality Center
By default, the test objectives that may be assigned to TestArchitect test modules and test cases are not carried over to Quality Center tests. You can remedy that, however, by creating a special test objective custom field.
