Getting started
Working with TestArchitect Client
Advanced features of TestArchitect Client
Getting started
Working with TestArchitect Client
Advanced features of TestArchitect Client Preferences
TestArchitect Client can be configured to your requirements with a large collection of customizable features.
You can set your TestArchitect Client preferences in the Preferences dialog box by selecting menu Edit > Preferences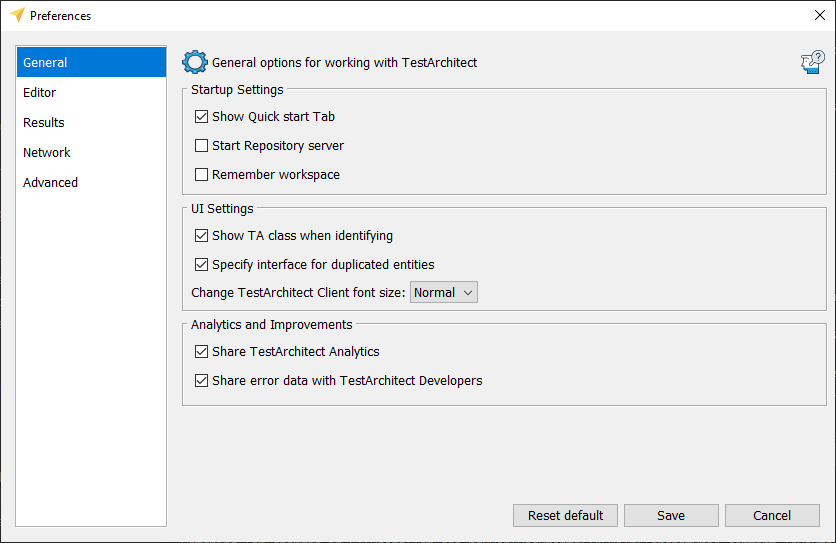
The following settings are available:
Test editor font: Select a font name to choose the typefont used by the test editor.
Test result font: Select a font name to choose the typefont used by the test execution result.
Save the test editor after every: Select the check box to autosave contents of the test editor, and set the time interval determining the frequency of saving.
Hide arguments using default value: Select this box to cause argument headers and values in action lines to be automatically removed when the values match the defaults defined for the called action.
Automatically archive deletion data to this location: Select check box to automatically save deleted TestArchitect data, and specify the storage location.
Help extension location: Select check box to specify a custom location for the Help extension file (See Help system extensibility).
Remember workspace: Select to have TestArchitect Client save the workspace before it exits. If enabled, the next time you launch TestArchitect, the last workspace saved is automatically reloaded.
Use Online Help: Select this option to open the help system documentation and TAUtilities API reference online. This gives you access to the latest updates to the help documentations.
Note:If the Use Online help option is enabled, pressing F1 while hovering over any part of the interface or selecting Help > TAUtilities API from the TestArchitect main menu results in TestArchitect attempting to open both the online help documentation and online TAUtilities API reference. Otherwise, the local help documentations are opened in offline mode.Automatically generate test objective and test case name: Select to automatically generate names for test objectives and test cases whenever you enter the test objective and test case actions in the editor.
Display warning message about invalid test module template: Select to display warning message if a test module template is invalid (See Test Modules for a valid module template).
Automatically insert step into test case: Select check box to insert your steps automatically to a test case (See Creating test steps.
Show TA class when identifying: Select to enable the TA class screentip when using identify method (See Point-to-identify mode).
Show pending result dialog: Select to show the Result Delivery Pending dialog box when executing test remotely (See Receiving test results of remote test execution).
Specify interface for duplicate entities: Select to show the Specify Interface dialog box to map ambiguous entities (see ambiguous entities for more details).
Enable Error Reporting: By using Error Reporting, descriptions of problems or errors will be sent to LogiGear, which we use to improve TestArchitect. We will also treat this report as confidential and anonymous. Error Reporting is enabled by default.
Enable Telemetry: The Telemetry feature sends performance and usage info to LogiGear. As you use TestArchitect, Telemetry measures and collects non-personal information, such as performance, hardware, and usage. Furthermore we use this information as a tool to improve TestArchitect. Telemetry is enabled by default.
Number of empty lines to insert when pressing Ctrl + Enter: Set the number of empty action lines that are inserted in the editor by this keyboard shortcut.
Note:Valid range: 3 to 10 lines; default: 4. (see Inserting empty lines for further information)Show start time: Select to show the local time in the test result, when TestArchitect begins executing each action line.
Show run duration: Select to show the elapsed time in the test result for each action executed.
Note:The action’s start and elapsed time can also be set from the toolbar on the Result details tabShow Quick start Tab: Select to display the Quick Start tab when TestArchitect is launched (See Quick Start).
Start Repository server: Select to start the local repository server when TestArchitect is launched, if not already running.
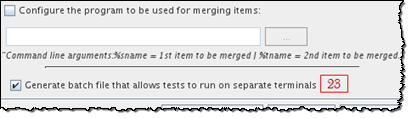
Configure the program to be used for merging items: Enable a third-party tool to be used in conjunction with TestArchitect’s Diff Tool for comparing or merging project items. (Learn more.)
Generate batch file that allows tests to run on separate terminals (only available in TestArchitect on Linux): When this options is selected, batch files are executed on separate terminals in parallel.
Remember:Clear this option, while generating batch files which are then run in the Docker environment.