
Recording control actions
How to use the Action Recorder to record interactions with UI controls in the sample application.
Before proceeding:
If the Car Rental application is running, return to the Login window; otherwise, start the application by selecting Start > All Programs > TestArchitect > Samples > Car Rental Application.
In TestArchitect, select Tools > Action Recorder Settings… and ensure that the settings are set as follows:
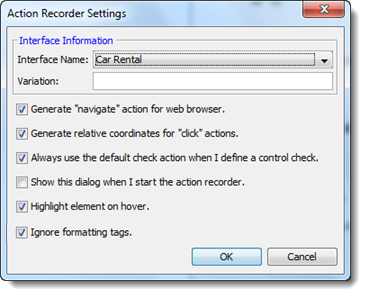
Then click OK.
Notes:The Generate “navigate” action for web browser, Highlight element on hover, and Ignore formatting tags settings only apply to browser-based recording (learn more), and may be ignored for purposes of this tutorial.
In the TestArchitect explorer tree, select any item within the Car Rental project, then click Create new test module
 in the toolbar.
The New Test Module dialog box appears.
Enter
Recording Lessonas the name, then click Create.A new test module appears in the main panel, ready for editing.
In the editor, in column C of the
TEST CASEline, enter a description such asRecording an actionReturn to TestArchitect, and in test case
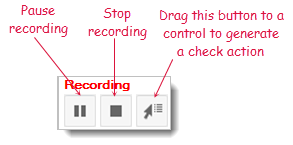
TC 01of the editor, select an empty cell in the first column (for example, A16).Attention:Once the Action Recorder starts, it records all actions, including any actions you take with this tutorial. For that reason, it is recommended that you pre-read this exercise up to Step 8 to ensure that the actions you record with Action Recorder are only those that relate to this exercise.Click Action Recorder icon on the toolbar:

The Action Recorder panel appears in the lower right corner of the screen, indicating recording mode is now in effect:
Within the Car Rental sample application, click Login to log in using the User name
Johnand an empty Password field.In the Welcome window of the Car Rental application, click New Order.
The Select Date and Location dialog box appears.
Select Florida in the Pick Up State list box.
Clear the contents (if any) of the Pick Up City text box, replacing them with
Miami.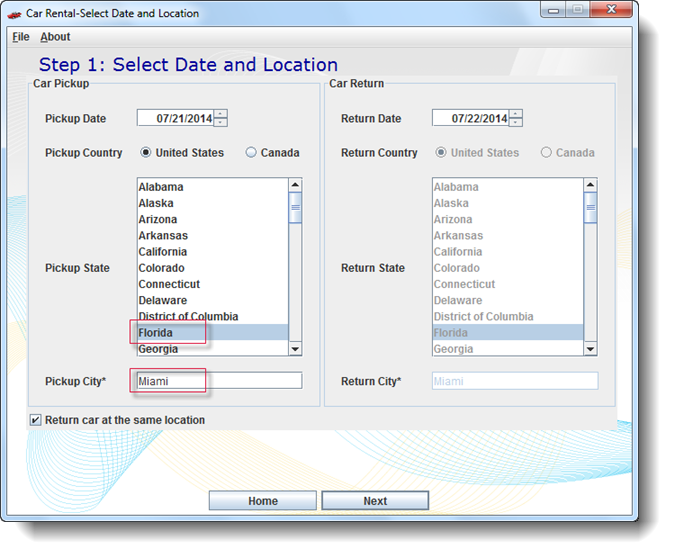
Click Stop on the recording panel.
Because the controls you clicked were already defined in the interface definitions for the sample application, nothing new was detected by the recorder. Had the recording involved previously unrecorded screens or controls, you would now be given the opportunity to review and edit the auto-generated TA names that TestArchitect created for them.
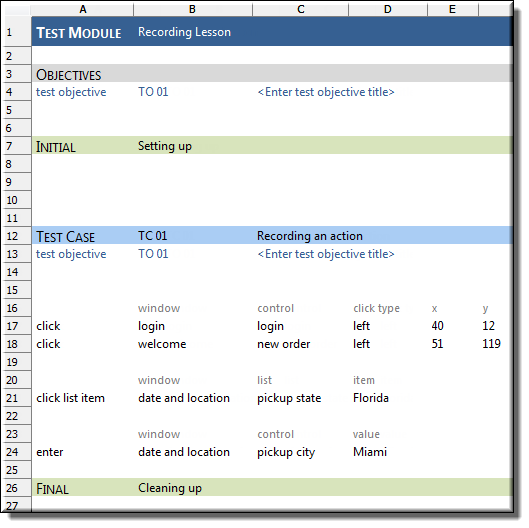
The actions representing the operations you performed on the dialog box have been generated and inserted into the test module, which should now resemble the following:
Now, to examine the results of your work, return to the Car Rental Login window: In the sample application’s Car Rental-Select Date and Location window, click a different state (for example, Alabama).
In the Car Rental-Select Date and Location window, click Home.
Click Yes when asked for confirmation.
In the Car Rental-Welcome window, select File > Logout.
You are now returned to the application’s Login window
With your test module displayed in the TestArchitect editor, click Execute
 on the toolbar.
The Execute Test dialog box appears.
Click Execute in the Execute Test dialog box.
A replay of your recorded actions should now be displayed in the application window, repeating the steps of logging into the application, navigating to the Select Date and Location window, selecting a Pickup state of
Floridaand entering a City ofMiami.
