
要求されたページは選択されたバージョンでは利用できない。
記録中の時のチェックポイント挿入
モバイルレコーダーは、テスト記録中の時のチェックポイントを挿入することを対応しています。特定のポイントでレコーダーがチェックを記録するには、以下の手順を実行します:
記録ツールバーのチェックポイント追加ボタン
 をクリックして、チェックポイント挿入モードをアクティブにします。
チェックポイントを挿入する要素を選択します。
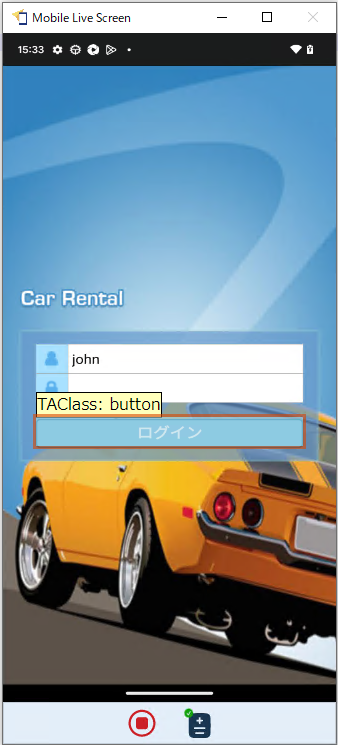
正しい要素を選択するために、モバイルレコーダーはユーザーが要素にマウスカーソルをホバーすると、その要素を四角形でハイライトしてくれます。さらに、TAクラスの値が表示されるツールチップが表示されます。
ESCキーを押して、チェックポイント挿入モードを解除します。注意:未知クラスのコントロールに対してチェックポイントを追加することはまだサポートされていません。チェックポイントを追加する前に、それを既知のクラスにマッピングする必要があります。(詳細はこちら)要素を選択した後、チェックポイント追加ダイアログが表示されます。
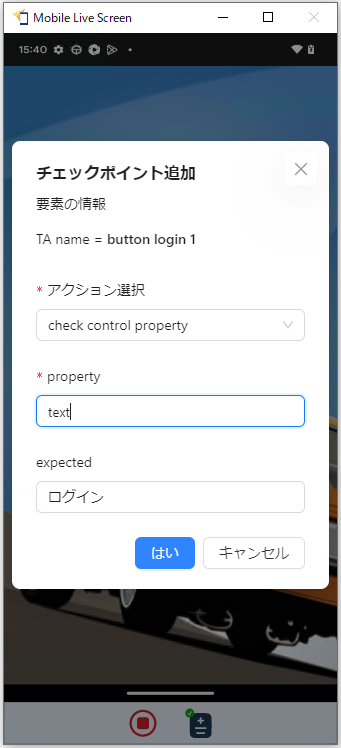
- TA名: 選択した要素の「ta名」を表示します。
- アクション選択:チェックポイントアクションのリスト。
- プロパティ:コントロールの利用可能なプロパティのリスト。
- 期待結果:チェックで返される期待の値。
注意:- 「アクション選択」ダイアログでcheck window existsを選択するとTA名は取得したエンティティの「win class」に変わります。
- 「アクション選択」ダイアログでcheck control propertyを選択した時のみ、propertyとexpectedフィールドが表示されます。
「はい」ボタンをクリックして、アクションをTestArchitectエディタに追加します。
