
Create a new project
You create a project to organize and store project information in TestArchitect. When you create a new project, TestArchitect automatically generates the containers (such as a Tests folder, Actions folder, etc.) for the project items (test modules, actions, etc.) that will belong to the project. Users can be logically assigned to a project, allowing them to work in it.
Ensure that your TestArchitect Client is running and connected to a repository.
To create a new project:
Assuming you already have a repository to host your project, right-click its node in the TestArchitect explorer tree, then select New Project.
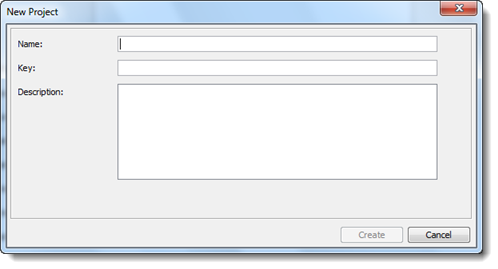
In the New Project dialog box, enter the following information:
- Name: The project’s name.
- Key: A key for the project, used as a prefix for TestArchitect bug IDs. (registered and unregistered). This key may consist of alphabetic and/or numeric characters. It is suggested that you ensure it is unique across all your projects, for easy identification of your documented bugs.
- Description: A short description of the project.
Click Create to create a new project.
The new project appears as a node under the repository node and contains the following project folders:
- Tests: Contains test folders and test modules.
- Data: Data sets that can be used in data-driven tests.
- Actions: User-defined actions available for the test modules.
- Interfaces: Definitions that recognize the interfaces of the application under test.
- Test Suites: Used to organize and execute test modules based on certain criteria.
- Bugs Contains bugs in TestArchitect. Bugs are fails in automation runs which impair or prevent the functioning of the automated test.
- Picture Checks: Contain shared pictures for testing bitmaps presented by the AUT.
- Results: Local and repository-based results of test runs.
