
Remapping known controls to a new TA class
The last topic discussed remapping known controls of an AUT to an existing TA class. Now we’ll explore how to remap known controls to a completely new class (that is, a newly created user-defined class).
- Windows Presentation Foundation (WPF)
- Win32
- iOS
- Android
- Silverlight
- Windows Forms (WinForms)
- SAP
Launch the application to be tested and navigate to the window containing the control(s) to be interfaced with.
Launch the Interface Viewer or the Element Definition dialog box.
制限: :The Element Definitions dialog box is unavailable with iOS and Android applications.In the UI explorer tree panel, navigate to your choice of a known class (as indicated by a gear
 icon), right-click a control node under it, and then click Map to New Class.
The Map to New Class dialog box is displayed:
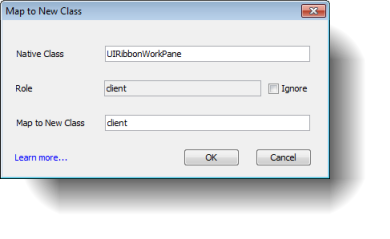
Provide the details for the class mapping.
Native Class:
- In WPF, Native Class is the native class property of the selected control - for example,
System.Windows.Controls.Button. - In Win32, Native Class is the win class property of the selected control - for example,
Button. - In iOS, Native Class is the class name property of the selected control - for example,
UIButton. - In Android, Native Class is the raw class property of the selected control - for example,
android.widget.Button. - In Silverlight, Native Class is the native class property of the selected control - for example,
System.Windows.Controls.Button. - In WinForms, Native Class is the native class property of the selected control - for example,
System.Windows.Forms.Button.
制限: :You cannot use a ta class, native class, or role as a native class’s name because they are (case insensitive) reserved words.ヒント:You can use regular expressions enclosed between curly brackets { } to add flexibility to native class matching. For example, given that the general purpose regex wildcard is .* (dot-star),{.*button.*}allows a single mapping to pertain to any native control class whose name includes the string “button”.- In WPF, Native Class is the native class property of the selected control - for example,
Role: (Uneditable field)
- For WPF, Role is the role property of the selected control - for example,
button. - For Win32, Role is the win type property of the selected control - for example,
button. - For iOS, Android this field is disabled.
- For Silverlight, Role is the class name property of the selected control - for example,
Button. - For WinForms, Role is derived from the object’s class name. For instance, for the full class name of System.Windows.Forms.Button, the short name Button is displayed in the Role field.
ヒント:If the control role is unnecessary for the class mapping (because you want to apply the mapping to all controls of the specified native class), select the Ignore check box.- For WPF, Role is the role property of the selected control - for example,
Map to New Class: Specify a name for the new class so as to map the selected control (and its related controls) to that new class.
重要:- The new class’s name must contain only alphabetical, underscore and whitespace characters.
- You cannot use a ta class, native class, or role as a native class’s name because they are (case insensitive) reserved words.
Click OK.
The known controls are remapped to the new, user-defined TA class, with the mapping recorded in the $ Class Maps entity.
Related concepts
