
Getting started with web testing
How to automate some common web testing tasks, such as launching the browser, navigating to web pages, and so on.
Before testing web applications on a supported browser, ensure that necessary settings or reconfigurations required by TestArchitect are fully met. For detailed instructions, see Preparing web browsers.
Specifying the browser
To select the type of web browser to run the test in, you may specify the browser in the use browser built-in setting. For example, you can choose Mozilla Firefox to be invoked.
             setting          value
setting      use browser      Firefox
Launching the browser and navigating to web pages
You normally launch a browser and open the web page to be tested at the beginning of a web test. You may also need to navigate to web pages in an already-running browser. You can perform these operations with the navigate action.
To navigate to a URL in a running browser, specify the window argument. For example:
              location             window         handle
navigate      www.google.com       home page      home1
Note that the window argument in this case is used to identify the browser window upon which the action is to operate. Depending on how this window is specified (that is, the property-value pair(s) used to identify it), that identification may no longer apply to the window once the new web page is loaded into it. The returned value of the handle argument, on the other hand, can be relied upon to identify the new window.
In the case of two browsers – Safari on macOS, and the desktop version of Google Chrome – the location argument of the navigate action must include the protocol (http:// or https://). For example, while navigating to Google in an Internet Explorer window can be achieved with
             location
navigate     www.google.com   ...
, doing the same in Safari macOS requires that the action line begin with
             location
navigate     http://www.google.com   ...
To launch a new web browser window and navigate to a URL, leave the window argument empty. For example:
              location             window         handle
navigate      www.google.com                      home2
As with desktop testing, you can use an interface entity to identify your browser web page and the controls within it. However, browser web pages are often highly dynamic, and you must use the returned handle from the navigate action to identify its window. Fortunately, the window arguments of actions, which normally take TA names referencing interface entities (e.g., home page), can also accept physical window handles (below). Also, dynamic web pages often require dynamic identifiers to specify controls. For example, the following uses a wildcard (dot-star) to allow for variations in the text property of the control of interest.
                           window        control
check control exists       #home1        [ta class=div, text={Car No .*}]
Waiting for web pages
Complex dynamic web pages may take a few seconds to load, and the web page scripts can also load additional content after the page has been loaded. As a result, the web page load time may vary. Successful testing requires that the automation correctly handle the varying response times of the web page, and not to attempt to continue with interactions before the web page is finished with the previous function. Therefore, TestArchitect waits for a web page to load completely before attempting the next action. That said, there is always a risk of a connection problem, a web application error, or any issue that might cause the web page not to load completely. To allow your test to handle such problems, rather than wait indefinitely, you can specify a maximum wait time with the page wait built-in setting. (For further information regarding how to handle timing issues, please refer to Timing.)
Handling JavaScript popups on Safari macOS
Due to the manner in which the Safari browser engine processes JavaScript code, modal popup windows produced in a web application by JavaScript cannot be tested in a conventional manner. To address this issue, TestArchitect offers a special set of actions for interfacing with JavaScript popups, which include alerts, prompts and confirmation dialogs. These built-in actions allow your tests to properly respond to JavaScript popups, and to capture their displayed content.
TestArchitect handles JavaScript popups in Safari macOS by overriding the function calls with its own set of inserted JavaScript.
The following TestArchitect built-in actions are provided to both scan and handle Safari macOS JavaScript popups:
| Action | Description |
|---|---|
| click on next popup | Click a specified button in a prompt, alert, or confirmation popup. |
| enter text on next popup | Write text to the user-entry field of a prompt popup, then click OK. |
| get popup message | Retrieve the messages of one or more of the last sequence of confirmation, prompt, or alert popups. |
| get popup default text | Retrieve the default text of the user-entry field of one or more prompt popups. |
| check popup message | Check the messages displayed by one or more confirmation, prompt, or alert popups against their respective expected text strings. |
| check popup default text | Check the default text of the user-entry fields of one or more prompt popups against their respective expected values. |
| clear popup queue | Clear remaining and unhandled popups in the current queue. |
- your action specifying a popup button that button does not exist; or
- the order of appearance of the AUT’s popups not being addressed properly by your test procedure.
You will need to stop the execution and debug the test.
Handling one or a series of popups:
Your test of a web application running under Safari macOS may trigger a single popup or a sequence of popups. It is important to understand how TestArchitect handles such popups, and how the popup-directed actions work, so that you can construct your tests properly.
Popup-handling actions. There are two actions that have a direct impact on Safari macOS popups:
click on next popup
Used for alert and confirmation popups.
enter text on next popup
Used for prompt popups.
It is essential that each JavaScript popup window in a test be dispatched with an appropriate popup-handling action. Furthermore, each such popup-handling action must be called prior to the point at which its targeted popup is actually invoked in the tested application. This ensures that TestArchitect’s own JavaScript code overrides the browser’s JavaScript popup function calls.
These two action types are applied to sequences of popups by means of a FIFO (First In, First Out) queue, referred to as the popup-handler queue. As each popup-handler action is called, it is added (enqueued) to the back of the popup-handler queue. The first encountered popup from the AUT is acted upon by the handler action at the head of the queue. After that, the action is removed from the queue (dequeued), and the next popup-handler action, if any, is advanced to head of the queue.
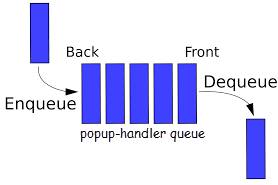 Important:In general, the situation to avoid is the one in which a popup is launched when the popup-handler queue is empty. Such unhandled popups make their presence known by the fact that they are visible: that is, without a TestArchitect popup-handling action to provide the overriding JavaScript-processing code, the browser’s own JavaScript API allows the popup to be displayed. (Something you don’t want, if you’ve been following along so far.) And your test, at least until you resolve the matter, grinds to a halt.
Popup-sampling actions. The remaining popup-directed actions listed above, with the exception of clear popup queue, are used to retrieve and/or verify messages and default text of the alert, confirmation, and prompt popups.
It has been mentioned that every JavaScript window that pops up needs to have an appropriate popup-handling action waiting for it in the queue, ready to instantly dispatch it to digital oblivion. If that is the case, how can it be possible for an action like get popup message to work, if no popup with a message is allowed to linger around?
The answer is that, unlike typical actions that test things in a GUI, the popup-sampling actions do not operate in “real time”. Instead, a history of popup windows, including their messages and default text, is maintained for the current popup session. (We’ll define popup session in a moment.) And it’s this history buffer that the popup-sampling actions actually target. (This history is maintained by the popup-handling actions. For example, before the action enter text on next popup dispatches a prompt window, it scans the popup’s message and default text, if any, and saves those items out to the history buffer.)
A popup-sampling action targets a specific popup by means of an index, with the most recent popup having an index of 1, the one preceding it an index of 2, and so on. Depending on the action involved, these indexes are appended to either a variable or expected argument. For example, the action below:
                        expected3
check popup message     You've got mail
checks the message from the third most recent popup against the string “You’ve got mail”, and results in a Passed or Failed accordingly.
Note that each of the four popup-sampling actions can address any number of the recent popups in a single action line, and does so by specifying as many of the variable or expected arguments as it needs to. For example, in a session that has just consisted of five popups, the following action line retrieves the message text of the first one, along with the last two:
                        variable5   variable2   variable1
get popup message       first_msg   fourth_msg  last_msg
clear popup queue. This final action essentially closes out your test’s popup session, preparing it for a new one. It does this by clearing out both the popup history buffer and the popup-handler queue. (Note, however, that we would generally expect a well-written test procedure to already have an empty popup-handler queue by the end of the session.) cases.
Session termination:
The built-in clear popup queue action (discussed above) is the one explicit means of ending a popup session, but a number of other events also have the same effect. You need to be aware of these, and take them into account when using popup-directed actions, to ensure that the popup history buffer expected by an action still exists. Each of the following events closes out a popup session, clearing out the popup history buffer, as well as the popup-handler queue:
- Page navigation
- Page refresh
- Safari shut down
- End of a test run
Example:
Suppose that you are testing a web page on Safari with the following scenario:
- Click the new email account button. A prompt popup appears, requesting an email address to be input. Its message is Specify a new email address and its default text is [email protected].
- In the prompt popup, enter an invalid email address and then click OK.
- The web page then displays an alert popup whose message is Invalid email address. You then click OK on that alert popup.
- Verify the message displayed in the alert popup.
- Verify the message and default input text displayed in the prompt popup.
A typical test procedures employing the above scenario above might look something like this: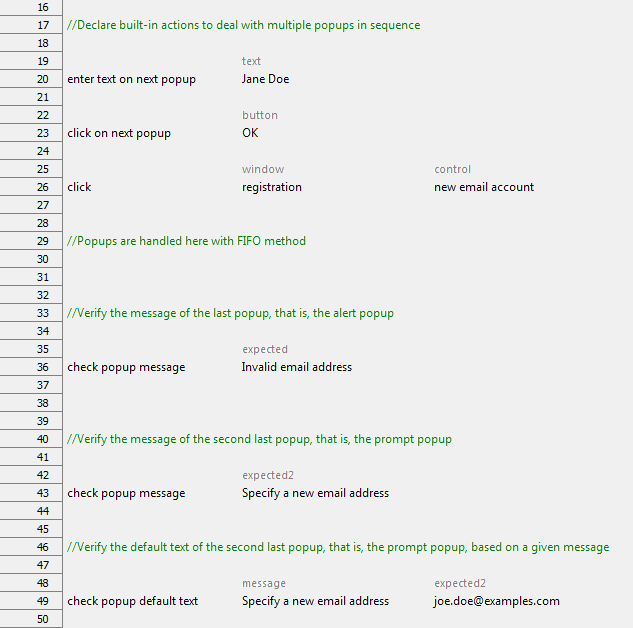
In the above action line procedures, the prompt and alert popups are handled in advanced with enter text on next popup (line 20), and click on next popup (line 23). The click action (line 26) clicks the new email account button and triggers a prompt popup. You will not see prompt popups appear since its function call is overridden at runtime by the enter text on next popup (line 20). Likewise, the coming alert popup’s function call is overridden by the click on next popup (line 23).
check popup message (line 36) verifies the message of the alert popup, that is, the last popup. In order to indicate the last popup, the expected argument is used. (As a convenience, the expected and expected1 arguments are identical – that is, they reference the same thing – as are variable and variable1.) Likewise, the expected2 argument of check popup message (line 43) indicates the second to last popup, the prompt. Finally, check popup default text (line 49) verifies the default text of the prompt popup, based on its given message.
Testing a web app in mobile emulation mode
TestArchitect allows you to create and run automated tests of web applications and websites on mobile devices without the necessity of having each such device available. By interfacing with Google Chrome DevTools, TestArchitect uses DevTools’ Device Mode to emulate mobile browsers within Chrome and allow your automated tests to run on them.
To invoke a mobile browser emulator in Device Mode, you first need to set up the correct mobile browser profile with the send command to browser built-in action. (See Creating mobile browser profiles to learn more about JSON-based device profiles.) The JSON string in the listing below includes the following parameters for a given mobile browser profile:
Use agent (userAgent parameter)
Whether to emulate a mobile device (mobile parameter)
Screen width (width parameter)
Screen height (height parameter)
Device pixel ratio (deviceScaleFactor parameter)
Whether a view that exceeds the available browser window area should be scaled down to fit (fitWindow parameter)
Enable touch event emulation (enabled parameter).
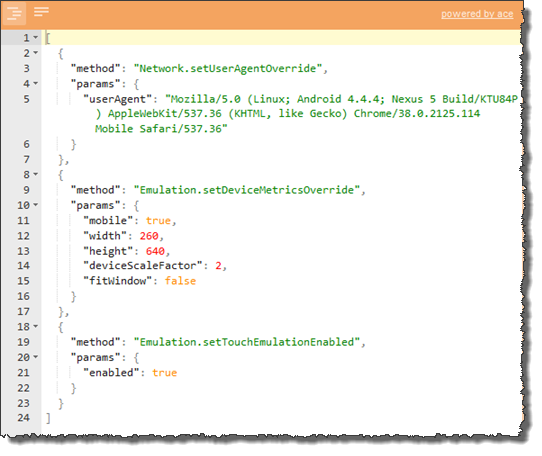
With your JSON profile for a given device browser established, copy the JSON string into the command argument of send command to browser in your test.
As an example, the following snippet of test opens the google.com page (with navigate), invokes a mobile browser profile (using the send command to browser built-in action).
//Launch Google Chrome

                          setting                    value
setting                   use browser                Chrome

//Navigate to a specific page in Chrome

                           location
navigate                   https://www.google.com/

//Invoke an emulator in Chrome's Device Mode

                            window                   command                                                                                                                                                                                                             variable
send command to browser     google                   [{"method":"Network.setUserAgentOverride","params":{"userAgent":"Mozilla/5.0 (Linux; Android 4.4.4; Nexus 5 Build/KTU84P) AppleWebKit/537.36 (KHTML, like Gecko) Chrome/38.0.2125.114 Mobile Safari/537.36"}},      >>emulator
                                                     {"method":"Emulation.setDeviceMetricsOverride","params":{"mobile":true,"width":260,"height":640,"deviceScaleFactor":2,"fitWindow":false}},
                                                     {"method":"Emulation.setTouchEmulationEnabled","params":{"enabled":true}}]

//Refresh the page to ensure the emulator takes effect

                            window
refresh                     google

//Develop web automation here
You may wish to change the environment for the emulator to customize its behaviors, after it has been launched. Again you can use the send command to browser built-in action (learn more). For instance, you may choose to change the following behaviors:
Configure network:
User agent (UA): Allows you to set a specific UA string override by using the setUserAgentOverride method. The following JSON string overrides the current UA.
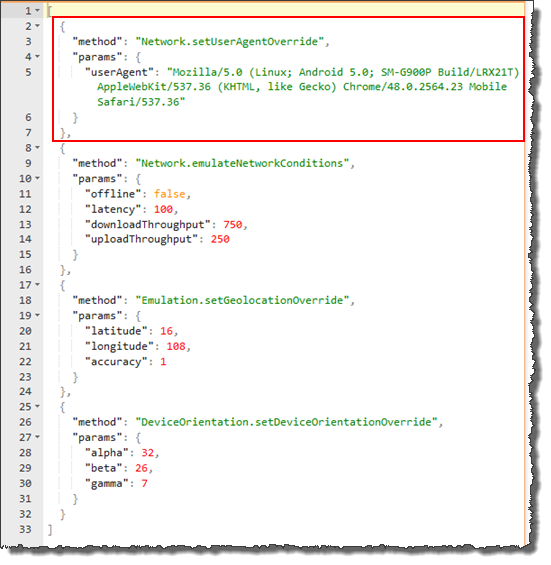
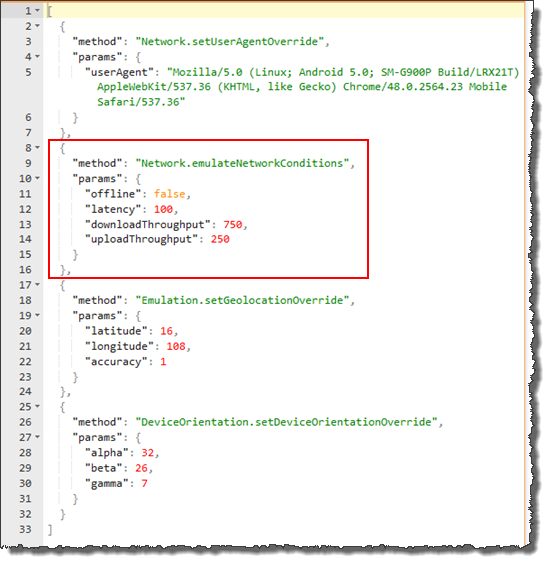
Network throttling: Emulate network connectivity to test your site on a variety of network connections, including Edge, 3G, and even offline, through the emulateNetworkConditions method. The following JSON string defines a Regular 3G network, including:
- Additional latency (ms)
- Maximal aggregated download throughput
- Maximal aggregated upload throughput
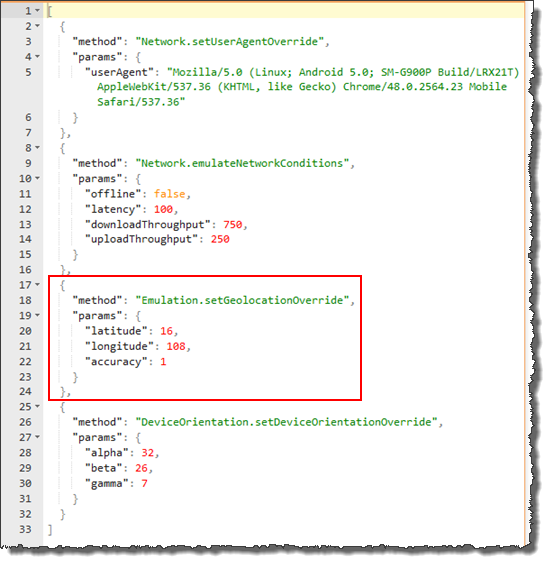
Emulate geolocation data: Unlike desktops, mobile devices commonly use GPS hardware to detect location. You can simulate geolocation coordinates by using the setGeolocationOverride method. The following JSON string enables the geolocation emulation including:
- Latitude
- Longitude
- Accuracy
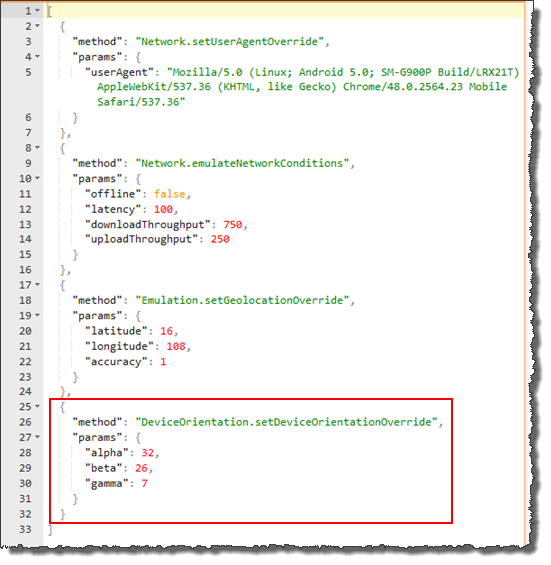
Emulate accelerometer (device orientation): To test accelerometer data, enable the accelerometer emulator by using the setDeviceOrientationOverride method. The following JSON string manipulates the following orientation parameters:
- Alpha: Rotation around the z-axis.
- Beta: Left-to-right tilt.
- Gamma: Front-to-back tilt.
The following snippet of test updates the current emulator’s behaviors on-the-fly.
//Launch Google Chrome
                            setting                    value
setting                     use browser                Chrome

//Navigate to a URL in Chrome

                            location
navigate                    https://www.google.com/

//Invoke a specified emulator in Chrome's Device Mode

                            window                    command                                                                                                                                                                                                           variable
send command to browser     google                    [{"method":"Network.setUserAgentOverride","params":{"userAgent":"Mozilla/5.0 (Linux; Android 4.4.4; Nexus 5 Build/KTU84P) AppleWebKit/537.36 (KHTML, like Gecko) Chrome/38.0.2125.114 Mobile Safari/537.36"}},    >>emulator
                                                      {"method":"Emulation.setDeviceMetricsOverride","params":{"mobile":true,"width":260,"height":640,"deviceScaleFactor":2,"fitWindow":false}},
                                                      {"method":"Emulation.setTouchEmulationEnabled","params":{"enabled":true}}]

//Refresh the page to ensure the emulator takes effect

                            window
refresh                     google

//Develop web automation here

//Change environment to customize emulator behaviors on-the-fly

                            window                    command                                                                                                                                                                                                          variable
send command to browser     google                    [{"method":"Network.setUserAgentOverride","params":{"userAgent":"Mozilla/5.0 (Linux; Android 5.0; SM-G900P Build/LRX21T) AppleWebKit/537.36 (KHTML, like Gecko) Chrome/48.0.2564.23 Mobile Safari/537.36"}},     >>new_behavior
                                                      {"method":"Network.emulateNetworkConditions","params":{"offline":false,"latency":100,"downloadThroughput":750,"uploadThroughput":250}},
                                                      {"method":"Emulation.setGeolocationOverride","params":{"latitude":16,"longitude":108,"accuracy":1}},
                                                      {"method":"DeviceOrientation.setDeviceOrientationOverride","params":{"alpha":32,"beta":26,"gamma":7}}]

//Refresh the page to ensure all new behaviors take effect

                            window
refresh                     google
- Whenever you invoke an emulator, or change an emulator’s behaviors on-the-fly, you are required to refresh its current page by means of the refresh built-in action before proceeding with further testing. This helps ensure that the invoked emulator and all new behaviors take effect properly.
- It should be noted that, upon conclusion of an automated run on the emulator, the Chrome browser automatically switches out of Device Mode and returns to Desktop Mode.
