
The requested page is not available for selected version.
Configuring proxy settings for a license server
You can configure the proxy using the Proxy settings in the Tools menu.
On the license server machine, launch the License Server Control Panel:
- Windows: do one of the following:
- Double-click the TestArchitect - License Server
 icon in your Windows notification area.
 - Select Start Menu > All Programs > TestArchitect > License Server.
- Double-click the TestArchitect - License Server
- Linux: do one of the following:
- Double-click the TestArchitect - License Server icon in your notification area.
- From a terminal window, navigate to /usr/local/logigear/licenseserver/licenseserver and run the TestArchitect License Server executable.
- Double-click the TestArchitect - License Server
- macOS: TestArchitect License Server is not currently available for macOS.
- Windows: do one of the following:
Select Proxy Settings… from the Tools menu.
The License Server - Proxy Settings dialog box appears:
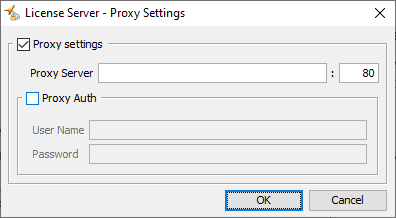 Notes:The Proxy Settings option is disabled by default. You need to enable it manually by checking the checkbox when you want to use a proxy.
In the Proxy Server text field, enter the host or IP address of the proxy server. The field next to Proxy Server is where the port of the proxy server is provided.
Proxy Auth: Turn this on if the proxy server requires a username and password for authentication. Then enter your credential information.
Click OK.
Related concepts
