
Automatically uploading TestArchitect test results to Team Foundation Server
When launching a test run from TestArchitect Client, you can configure TestArchitect to automatically upload the test results to TFS upon conclusion of the run.
Ensure that you have already taken the following steps:
- Registered the TFS server with TestArchitect. (Learn more.)
- Mapped the TestArchitect project containing the test cases of interest to a TFS project. (Learn more.)
- Mapped TA test cases to TFS test cases. This can be achieved by any of the following means:
- importing TFS test suites or test cases into TA,
- uploading TA test modules/tests cases to TFS,
- performing manual mapping between TA test cases and TFS test cases.
- When you specify the working directory, which the build agent uses to read from or write to files, please ensure the path to the working directory is not too long. Specifically, the specified working directory must not cause the build agent to produce any physical paths that are longer than 259 characters (learn more). Otherwise, your builds might fail and log this error: TF10128: The path <PhysicalPath> contains more than the allowed 259 characters. Type or select a shorter path. When you encounter this issue, names of TestArchitect test results which are uploaded to TFS are shortened (learn more).
To automatically upload TestArchitect test results to TFS after execution:
Initiate TestArchitect test execution as you normally would. (Learn more.)
The Execute Test dialog box appears.
On the General tab, in the Build Number field, specify a build number.
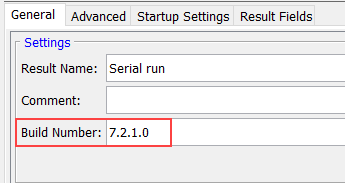 Remember:
Build number is a built-in field for both TestArchitect and TFS, representing the AUT build.

If your TestArchitect installation is integrated with Visual Studio Team Services, formerly known as Visual Studio Online, be aware that the Build Number field in Visual Studio Team Services is governed by a user-specified domain of values. That is, any build number supplied from TestArchitect must first exist in Visual Studio Team Services’s list of allowable build numbers.
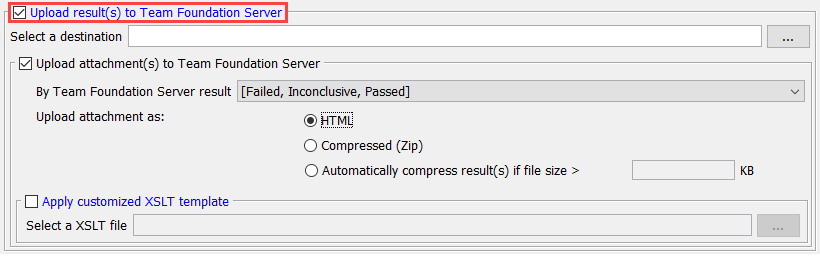
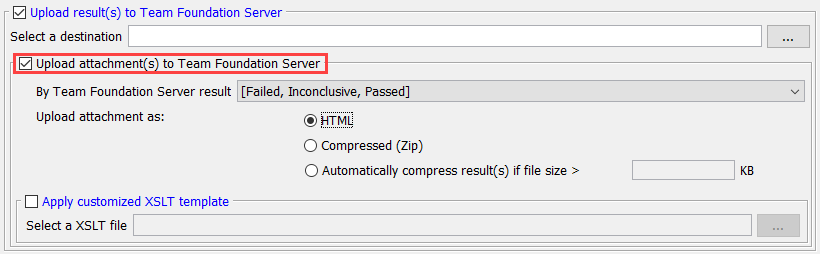
Switch to the Advanced tab, and then select the Upload result(s) to Team Foundation Server check box.
Click the browse
 button.
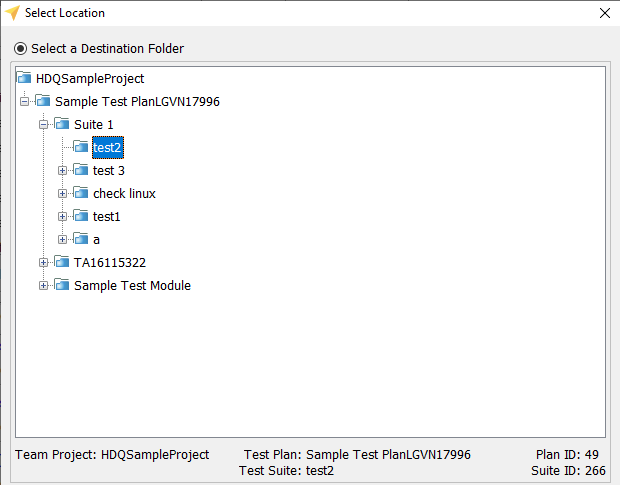
In the Select Location dialog box, specify a location on TFS to which you wish the result uploaded. You can do this by either of two means:
By explicitly defining the location:
- Click Select a Destination Folder.
- Select the location to which the result should be uploaded, and then click OK.
By using Work Item Query Language, only appear when user select TFS Helper - All Version of Team Foundation Server in Uploading method (WIQL).(Learn more.)
Click Work Item Query Language (WIQL).
Enter a WIQL query to query for a collection of satisfied TFS test cases, and then click OK.
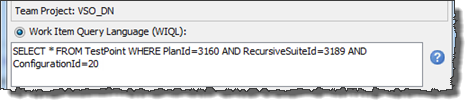 Tip:Click the question mark icon to see the typical syntax of a WIQL query.
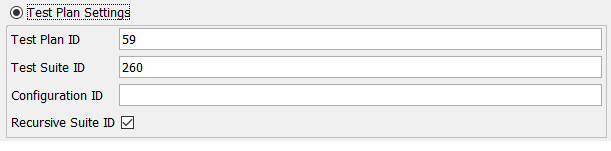
By using Test Plan Settings, which only appear when you select Rest API - Team Foundation Server 2015 Update 4 in theUploading method
- Select Test Plan Settings.
- Enter Test Plan information to query a collection of satisfied TFS test cases, and then click OK.
By using Test Run Settings, which only appear when you select Rest API - Team Foundation Server 2015 Update 4 in the Uploading method
Select Test Run Settings.
Enter Test Run information to query a collection of satisfied TFS test cases, and then click OK.

You could also configure this setting by using arguments in execute command
Select the Upload attachment(s) to Team Foundation Server check box to upload the TestArchitect test result to selected TFS test cases as an HTML file attachment. (Selectivity is determined by the field as follows).
The By Team Foundation Server result list box allows you to specify which associated TFS test cases are to receive links to the attached test result. This determination is based, for each given test case, on its result in terms of its TFS outcome.
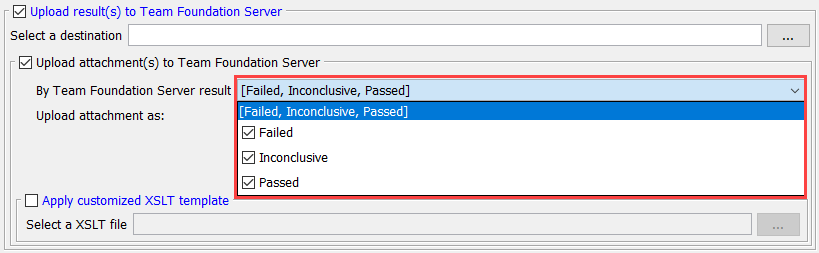
Passed: Attach the TA test result file if the test case’s TFS outcome is Passed.
Inconclusive: Attach the TA test result file if the test case’s TFS outcome is Inconclusive.
Failed: Attach the TA test result file if the test case’s TFS outcome is Failed.
Notes:The mappings between TestArchitect result statuses and TFS outcomes (that is, how TFS interprets each TA result status) are defined during initial configuration of the TA repository’s connection to the Team Foundation Server. (Learn more.)
If more than one condition is selected, they are effectively OR’d together. For example: If both Passed and Failed check boxes are selected, any TA result that has an TFS outcome of either Passed or Failed is uploaded as an attachment.
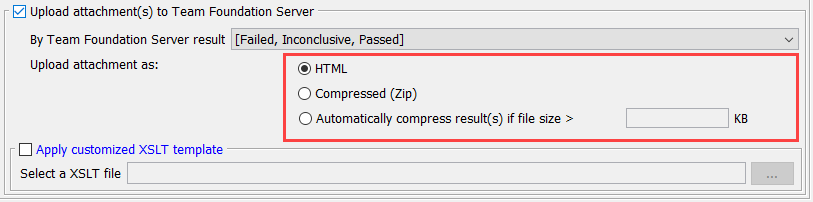
In the Upload attachment as panel, select the format of the uploaded test result.
- HTML: (Default) Upload the result as an HTML file.
- Compressed (Zip): Upload the result as a zipped HTML file.
- Automatically compress result(s) if file size > KB: Upload the result as a compressed (zipped) HTML file if the file exceeds the specified size. Otherwise, upload the result as an uncompressed HTML file.
Optional: To upload results as an HTML with your own view layout, select the Apply customized XSLT template check box, and then choose a location of your customized XSLT template.
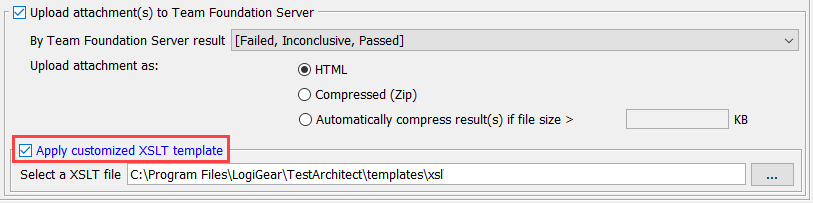
You are first required to customize the default XSLT template, which means you need to modify a set of XSL files to suit your desired view layout. (See more examples here.)
Attention:When your customized XSLT is invalid, the default XSLT template, located at the {TA_INSTALL_DIR}\templates\xsl\ directory, is automatically applied.Notes:if you are using a repository on another machine, make sure that the template you choose is accessible to the repository server under the account that starts the repository server service. It means that the template needs placing either on the repository server or in a network shared folder. Otherwise, the default template will be used.In the Execute Test dialog box, click the Execution button to begin test execution.
After the test run ends, TestArchitect automatically uploads the generated test results to TFS at the specified location and displays the upload confirmation message.
Click OK to close the confirmation dialog box.
TestArchitect test results are uploaded to TFS in the format specified in step #8.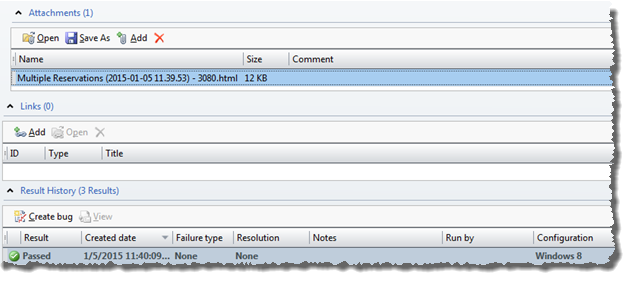
In case of test results generated from a serial test run, that is, running multiple test modules sequentially within a single test run, if the given Build Number’s values among test modules are not identical, the test results are unable to be uploaded to TFS. (Learn more.)
- When name of the working directory of build agents in combination with name of TA tests have more than 260 characters, filename of TestArchitect results, uploaded to TFS, are automatically shortened based on the following format: T<“TfsTestID”>.html. Otherwise, the uploaded test result’s filename remains unchanged.
- Similarly, for subresults in case of serial test runs, when name of the working directory of build agents in combination with name of TestArchitect tests have more than 260 characters, filename of TestArchitect results, uploaded to TFS, are automatically shortened based on the following format: T<“TFSTestCaseID”>_<“indexNo”>.html. Otherwise, the uploaded test result’s name remains unchanged.
- Alternatively, you might use TFS test ID to name the TestArchitect test results attached to TFS by using TFS-MTM Extensibility.
