TestArchitect Tutorial  Part 5: Getting started with Mobile Application Testing
Lesson #14: Connecting to a mobile device
Part 5: Getting started with Mobile Application Testing
Lesson #14: Connecting to a mobile device
Part 5: Getting started with Mobile Application Testing
Lesson #14: Connecting to a mobile device The requested page is not available for selected version.
Inputting desired capabilities
To begin with, input capabilities to specify the devices you intend to connect.
Steps:
- Open TestArchitect.
- Start the Interface Viewer.
- Click the Connect to device button
 on the Interface Viewer’s toolbar.

- When you launch the “Connect to device” dialog for the first time, TestArchitect will propose 5 capabilities and their corresponding example values.
 Download the example json file here. (Learn more how to import capabilities file)
 - To add more capabilities, click the plus button
 . To remove a capability, click the minus button
  at the right end of the line.

Notes:
- To input URL, please use following format:
- To connect to an on-premise Appium server: http://
<AppiumServerIP:port>/wd/hub.
For example: http://192.168.167.1:4723/wd/hub. - To connect to cloud-based Appium server: https://
<RemoteServerURL>/wd/hub.
For example: https://gwvn.remotetestkit.com/wd/hub (URL of Remote Testkit cloud provider).
- To connect to an on-premise Appium server: http://
- TestArchitect suggests a total of 8 capabilities (automationName, platformName, platformVersion, deviceName, app, UDID, browserName, newCommandTimeout).
- Please refer to this link for more information about Appium Capabilities.
- For any specific capability or syntax related to cloud device, please visit the cloud provider website to get more information.
Data types:
The data type of the capability must be defined before inputting its value.
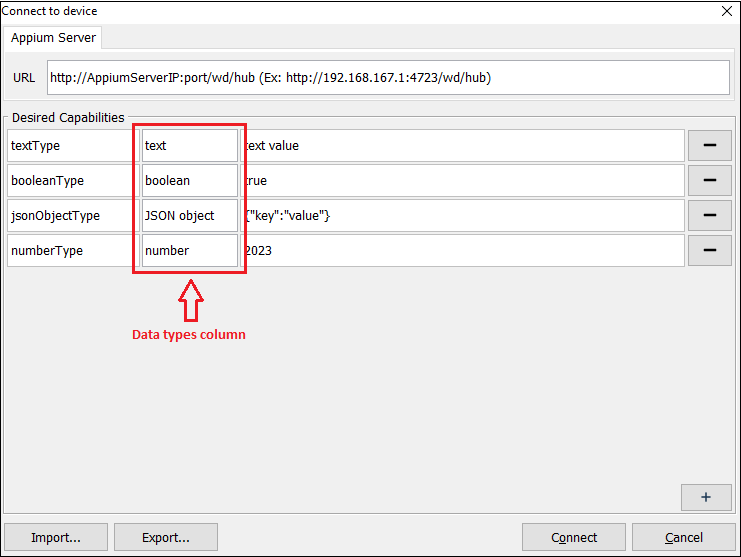
- Text: accepts any characters and empty.
- Number: accepts all types of numbers and cannot be empty.
- Boolean: accepts true/false values only and cannot be empty.
- JSON object: accepts JSON object format only and cannot be empty.
Notes:
- The capabilities name can not be empty and must be unique.
