Launching TestArchitect Client for the first time
TestArchitect Client is the integrated test development and test management environment of TestArchitect.
Launch TestArchitect Client to create, maintain, and execute your testing project.
Windows users
Double-click the TestArchitect icon on your desktop, or select: Start menu > All Programs > TestArchitect > TestArchitect Client.
Linux users (KDE)
Double-click the TestArchitect icon on your desktop, or select: K Menu > TestArchitect > TestArchitect Client.
macOS (Macintosh) users
Double-click the TestArchitect icon on your desktop, or select: Go > Applications > TestArchitect > TestArchitect Client.
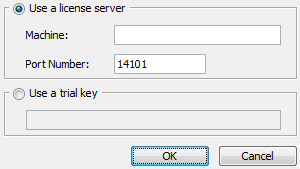
When TestArchitect starts up, it looks for a license server to verify the product’s license information. If you are launching TestArchitect for the first time, you are prompted to supply the location of the license server.
- If you have chosen to use TestArchitect for evaluation, select Use a trial key, then enter the trial license key that you received from the TestArchitect sales team. (If you do not yet have a trial license key, please contact [email protected] to request one.)
- If you or your organization has purchased TestArchitect licenses, contact your TestArchitect license server administrator to obtain the license server name or IP address. Once you have that information, select the radio button Use a license server to enter it into the license server dialog box.

If the specified license server is reached successfully, the provided contact information is stored. From then on, when you launch the client, this prompt is no longer presented.
If at some point in time you need to change the license server information, first disconnect from all repositories. Then, in TestArchitect Client, select License Server from the File menu.
Related concepts
Troubleshooting power outage-related problems