TestArchitect Tutorial  Part 4: Getting started with Mobile Web Testing
  Lesson #12: Building mobile web testing script
The requested page is not available for selected version.
Capture web element with Mobile Web Emulation
After defining the test script, it’s time to capture the elements on the web page.
TestArchitect supports a tool to emulate the mobile webpage. Please refer to this topic for tool guide, then use it to capture mobile web element.
Now, we will start Mobile Web Emulation with url https://gdemo-shop.netlify.app.
Based on the previous topic, our test script will work on two pages: shop page and cart page.
Capturing “shop page”
- Create Interface Entity “shop page”.
- Keep “shop page” editor open.
- Select menu item Tool –> Interface Viewer….
- On the Interface Viewer, click the hand button.
- Capture “Shopping Cart” icon with name as “svg_cart” on Mobile Web Emulation.

- Save then close Interface Viewer. Editor will be generated as below.
- Checkin Interface Entity “shop page”.Note:Because “ADD TO CART” button is dynamic on item name, we don’t capture it into Interface Entity. The next topic will guide about how to use the dynamic identifier in test script directly.
Capturing “cart page”
- On Mobile Web Emulation:
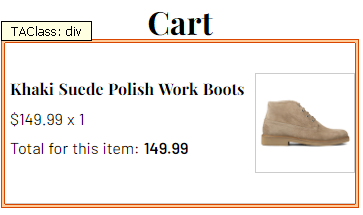
- Click “ADD TO CART” button on “Khaki Suede Polish Work Boots” item.
- Click “Shopping Cart” icon at the top right to go to Cart page.
- Create Interface Entity “cart page”.
- Select menu item Tool –> Interface Viewer….
- On the Interface Viewer, click the hand button.
- Capture the “cart count” icon with name as “div_cart count”.

- Capture “Khaki Suede Polish Work Boots” item in cart with name as “div_cart item”.

- Save then close Interface Viewer. Editor will be generated as below.
- Checkin Interface Entity “cart page”.

