Re-signing the Android application
Resigning applications is the first step in the process of installing them for testing purposes.
Every application that runs under the Android system has been digitally signed with a certificate that is unique to the application’s developer. However, TestArchitect cannot properly interface with any application unless it is re-signed with a certificate that has been configured to allow for testing by TestArchitect. (You may use TestArchitect Client’s own certificate, or your own, as long as it has been configured correctly). This must take place before the application is installed on any target device.
- In Windows, locate TestArchitect Client in the Start menu, right-click it, and click Run as administrator.
- In Linux, to run TestArchitect Client as root, do the following:
- Open the terminal.
- Switch to root by typing the command
su -. - Enter the root password.
- Change the current directory to the following location: /usr/local/logigear/testarchitect/workstation.
- Use the command
./TAClient.shto start TestArchitect Client.
To re-sign your application, follow these steps:
Open the Android Instrumentation Tool dialog box.
In the dialog box, click Install more.
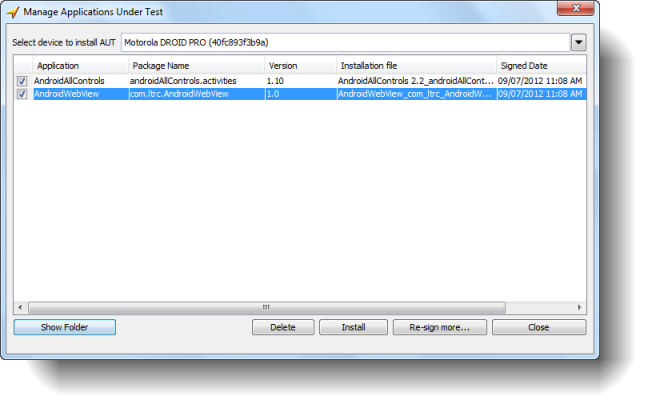
Note:The Install more button is enabled only if at least one device is running and is recognized by the Android Instrumentation Tool dialog box.The Manage Application Under Test dialog box appears.

To re-sign a new .apk application file, click the Re-sign more button.
Tip:By default, TestArchitect re-signs an Android application with a LogiGear signature. You may alternatively select to re-sign the application with your self-signed signatures (refer to Configuring customized signatures for details). If you encounter issues while re-signing, refer to Troubleshooting custom signatures.Navigate to and select the .apk application file, and then click Open.
A dialog box appears confirming that the AUT application has been re-signed successfully. Click OK.
In the Manage Application Under Test dialog box, the re-signed package is added to the list of available applications.

The .apk file is copied to a local folder on the host PC, renamed (with the package name appended to the original .apk file name), and re-signed with the TestArchitect or your self-signed certificate.
Note:The local folder containing the copied .apk file acts as a repository for re-signed applications, and each of these applications may eventually be installed into any number of devices, physical or virtual, without the necessity of re-signing each time. To quickly access the host PC directory containing the re-signed .apk, click the Show Folder button.
What you see in the Manage Application Under Test dialog box are:
A drop-down list of currently-available physical and virtual Android devices.
Tip:Multiple devices may be concurrently selected from this list.A list of Android application package files (.apk files) that have been re-signed.
Note:The applications list is unaffected by which devices from the drop-down list are currently selected. This is not a list of applications installed in the selected device(s), it is a list of re-signed applications residing on the host PC, ready for installation onto the devices.
Related information
Installing the Android command line tool
LogiGear Corporation
![]() Tel:
+1 (650) 572-1400
Tel:
+1 (650) 572-1400
![]() Email:
[email protected]
Email:
[email protected]