Configuring the Quality Center connection
Configure a TestArchitect repository to allow it to connect to a Quality Center server.
Ensure that, within the TestArchitect Client repository with which you are working, your account is a member of the administrators group. You should also have the URL of the Quality Center server, including the port number.
To set up the TestArchitect repository for integration with an HP Quality Center server:
From a TestArchitect client session, log in to the repository for with an administrative account.
Expand Administration > Tool Profiles > External Tool > Test Management node on TestArchitect explorer tree.
Note:Only TestArchitect users belonging to the administrator group are able to view and modify the Administration node in the explorer tree.In the expanded list of options, double-click the Quality Center node.
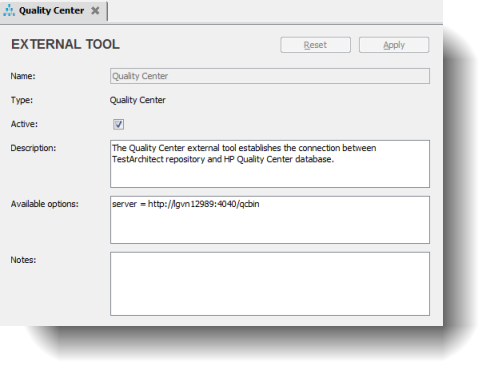
The Test Management panel of the Quality Center tab appears. This is where you set up the parameters of your Quality Center connection.
Select the Active check box to enable the Quality Center external tool.
Enter the following information:
- Available options: list of options as described below, separated by semicolons.
server=[QC server url](URL of Quality Center server, including port number, and a directory path, if applicable.)machines={TestArchitect controller network names or IP addresses}(Optional. List of TestArchitect controller IP addresses, separated by commas.Note:These are the controllers that will be presented to you as test hosts when you execute tests from Quality Center. (Note, however, that you will not be restricted to only using controllers from this list.)
)title in comment=yes(Optional; default = no. Upload TestArchitect test case titles to Quality Center as comments. The values of TestArchitect test case titles are loaded into Quality Center Comment fields. See Mapped items between TestArchitect and Quality Center for further information).
- Notes: (optional) Enter any notes.
Example: server=http://lgvn12989:4040/qcbin; machines= 192.168.167.68,192.168.167.69; title in comment=yes
- Available options: list of options as described below, separated by semicolons.
Click Apply.
Caution:As a general rule, only one test management tool can be active at a time for a given TestArchitect repository. If you select the Active check box and click the Apply button, the new external tool becomes active and any other tool formerly in use is automatically rendered inactive. For example, activating the Quality Center external tool automatically deactivates the Team Foundation Server external tool.
Example setup:
 Note:Be aware that clicking Apply only has the effect of saving the connection and configuration information for later use, as opposed to attempting a connection. It is only later, when direct communication between projects is attempted, that you will receive confirmation that your connection data is correct.
You are now ready to map your project to a project in Quality Center.