
Setting up primary/replication repositories
Replication repositories are created during a repository import. This process also establishes a relationship between the primary repository and replication repository.
Ensure that the following requirements are met:
- The file to be imported into the replication server(s) must be one that was exported from a primary server. Additionally, there must not have been any changes to the primary repository during primary-replication setup.
- The repository server on the remote host (primary server) is currently running, and is indeed currently hosting an instance of the repository you are now importing.
To set up a repository as a replication repository, do the following:
If not already running, open the Repository Server Control Panel dialog box.
Click Import Repository
 on the toolbar, or select Tools > Import Repository.
In the Open dialog box, specify the path to the .dat file to be imported.
Tip:You can select multiple repository files to import them in a single operation.Click the Open button.
The Import Repository dialog box appears and displays information on the selected repository files in the Import Information list.
Note:A repository exported from a pre-7.3 version of TestArchitect may have an issue when imported into TestArchitect 7.3 or later, if the original repository name contained any underscore (_) characters. Please note that the suggested name in the Repository Name column may not accurately reflect the original name.Select the Import as Replication Repository check box.
Restriction:Since you are importing the repository as a replication, you are not allowed to modify the default name in the Repository Name field.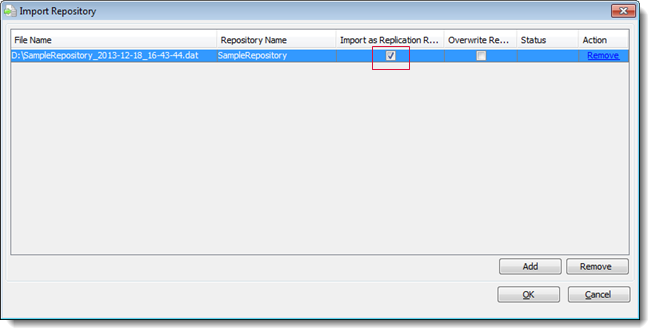
Click OK.
A status bar indicating the progress of the import is visible in the bottom left corner of the Import Repository dialog box.
Note:If the status of the imported repository files is Error, please refer to Troubleshooting repository import.When the import process finishes, a successful notification message replaces the progress bar in the status area. The successfully imported repositories display a status of Done.
Click Close to exit the Import Repository dialog box.
The Repository Server - Control Panel dialog box appears:
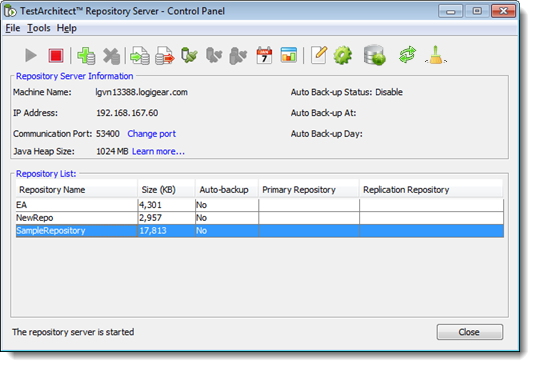
Configure the imported repository to designate it as a replication repository.
In the Repository Server Control Panel dialog box, select the repository that you imported as a replication repository, then click the Set Primary Repository
 button on the toolbar.
The Primary Repository Setup dialog box appears, requiring you to supply the connection information for the associated primary repository server.
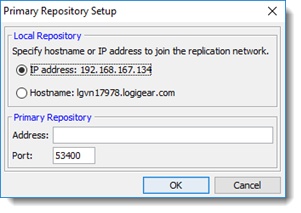
In the Local Repository panel, register your host machine with the replication network. Choose either of the following options:
- IP address: IP address of your host machine. The option is selected by default. You ought to select this option if your machine has a static IP address.
- Hostname: Name of your host machine. You ought to select this option if your machine has a dynamic IP address.
In the Primary Repository panel, in the Address box, type either the IP address or the hostname of the machine which hosts the primary repository.
The default port for repository servers is 53400, and appears in the Port box. Leave this as is, unless a different port is used on the server to which you are referring.
Click OK.
If the repository is successfully imported as a replication repository, the host and port of the associated primary repository are displayed in the Primary Repository field in the Repository List panel. Likewise, a check of the Repository Server Control Panel dialog box on the remote host reveals a complementary link in the Replication Repository field.

Related tasks
