 Application testing
Mobile testing
Testing mobile applications
iOS Automation
Setting up the iOS test environment
Setting up iOS automation
Application testing
Mobile testing
Testing mobile applications
iOS Automation
Setting up the iOS test environment
Setting up iOS automation Re-signing and installing applications on iOS
In order for an application to run as AUT on an iOS device, that application must be re-signed, then installed.
Ensure that the basic requirements are met before re-signing and installing your applications (see Prerequisites for details).
The following procedures for re-signing the TestArchitect Agent app must be performed on an macOS machine:
Obtain the full name of the private key of your iOS developer account from Keychain Access:
Open Keychain Access from Applications > Utilities > Keychain Access.
In the Keychain Access window, click login in the Keychains panel, and then click Keys in the Category panel.
In the Name panel, expand the imported private key node you want to use, right-click the certificate, and select Get Info on the context menu.
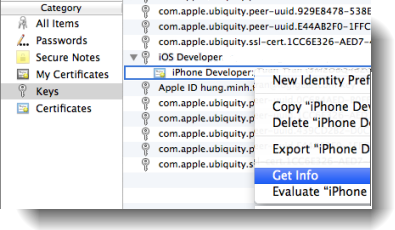
Make note of the device’s provisional Common Name.

Place the following files into a folder with full read and write permissions.
- resign.sh
- The provisional profile file (*.mobileprovision)
- your .ipa application file
- FileInfo
- iOSInstrumentationDyLib.dylib
Note:resign.sh, FileInfo and iOSInstrumentationDyLib.dylib files can be found at the following location when TestArchitect is installed: Applications/TestArchitect/device/iOS/resource.Start the command line terminal and navigate to the directory to which you copied the files in the preceding step.
Make the script file resign.sh executable by entering the following command to the terminal, followed by pressing
Enter.chmod +x resign.shExecute the resign.sh script with the name of the private key obtained in the earlier step as the first parameter, the name of the provisional profile file as the second parameter, and the name of the application file to re-sign as the third parameter.
Syntax: resign.sh <Common Name of private key in Keychain Access> <file name of the provisional profile> <file name (without or with the .ipa suffix) of the application file to re-sign>
Note:Providing the file name’s extension (.ipa) is optional. If not provided, the script assumes an extension of .ipa.The resign.sh script terminates with the message replacing existing signature, to indicate that re-signing was successful.
- Connect the iOS device to the test machine using a USB cable, and install the re-signed application file onto the device with iTunes.
Double-click the .ipa application file that you re-signed.
Using iTunes, synchronize the re-signed application file with the device.
The re-signed application is installed onto the device.
Tip:You can perform step 6 on either an macOS or Windows machine.
After installing the re-signed application onto the iOS device, the application icon is available on the device’s desktop.
